Released by Jens Kafitz, 2017 - Extension Pack
RELEASE: May 10th, 2017
LAST UPDATE: October 16th, 2018 (Update 15)
REQUIREMENTS: MARI 3.2, 3.3 or 3.4 *(Indie/Non-Commercial are not supported)
ICONLEGEND
 = Feature available via Nodegraph only
 = New or updated Demo Video available (click icon to jump to video)
 = Demo Video available from previous release (click icon to jump to video)


 = Feature / Fixes added after initial Release of Extension Pack 4
|
NEW FEATURES |
Click on a feature for more information
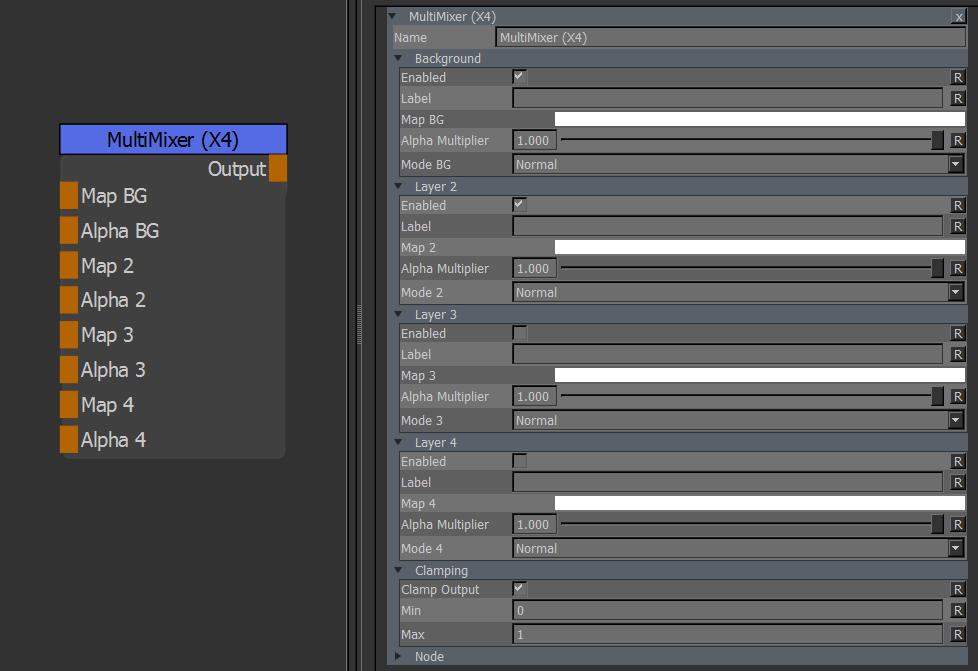
The MultiMixer Node mimics Anders Langlands Arnold alLayerFloat and alLayerColor Nodes and allows you to layer multiple node streams.
It acts like a Merge Node or 'Layered Texture' Node without Advanced Blendmodes but with the ability to layer up to 8 Inputs and 8 Alphas.
Identical to the MultiMixer x8 but with 4 slots instead of 8, to avoid overhead where you don't need it.
The Height Blend Node allows you to blend two displacement maps easily.
Outputs either combined displacement or mix mask and works best when outputting 16/32 bit displacement maps.


The AB Wipe Node allows you to compare two Inputs with a screen wipe

Array Nodes are variants of existing Extension Pack Nodes with support for up to 6 Image Inputs
to make handling of Quixel Megascan Data (or any other material data) easier.
The Image Array Node is a variant of the Extension Pack Image Node with support for 6 Texture Maps.
By using Manifolds you can simultaneously change tiling, offsets etc. without the need to manage multiple
Image Nodes.
The Axis Projection Array Node is a variant of the Extension Pack Axis Projection Node with support for 6
simultaneously projected Texture Maps.
A new node Array Mix was added with the ability to mix 6 image inputs from two sources via a mask
The Texture Scatter Triplanar X1 Node is a seamless 3D Projected Texture Scatter Node.
The new Texture Scatter 2D X1 Node is a simplified version of the previously released Texture Scatter 2D (Tileable) Node.
It supports only one input texture, which drastically reduces computation allowing the user higher complexity without
performance loss introduced by potentially unused texture slots.
- A new Base Color Attribute was added that allows you to completely fill the first layer of the node with a constant color.
- A Variety of UV related Options have been added:
- UV Repeat - a great way to add higher density without the added cost of computing more scattered cells
- U / V Scale - allowing you to squash and stretch your cells
- UV Rotation - A global rotation for the result of the computation in addition to the per cell rotation options
- UV Offset - Translate the finished result in UV Space
- Per UDIM Pivot - If ticked on (default behavior) UV scaling & rotation will be applied with a pivot at each UDIMs center
otherwise the pivot for all UDIMs will be in the lower left corner (0/0) of UDIM 1001 (![]() )
)
- A Manifold Connection was exposed on the Node in the Nodegraph
- You can now jitter the shape of each cell by attaching a noise or similar to one of the 'Edge' ports in the Nodegraph. This helps to break up artificial
looking 'stamping' patterns introduced when using the Edge Falloff Settings in the Texture Slot.
- The group names and UI has been adjusted compared to the old Texture Scatter 2D (Tileable) Node
|
|
DO NOT KEEP TEXTURE SCATTER NODES LIVE The various Texture Scatter Nodes of Extension Pack are not meant to stay live in your scene. Utilize Caching,Bake Points or Convert to Paintable after you have a satisfying result to keep performance up. |
The Directional Gradient Node replaces the previously introduced Object Space Linear Gradient (centered) Node
and should further improve its ease of use.
Previous Project Versions will still use the Object Space Linear Gradient (centered) Node but the original node
has been hidden where possible in the menus in order to encourage usage of the new Directional Gradient node.

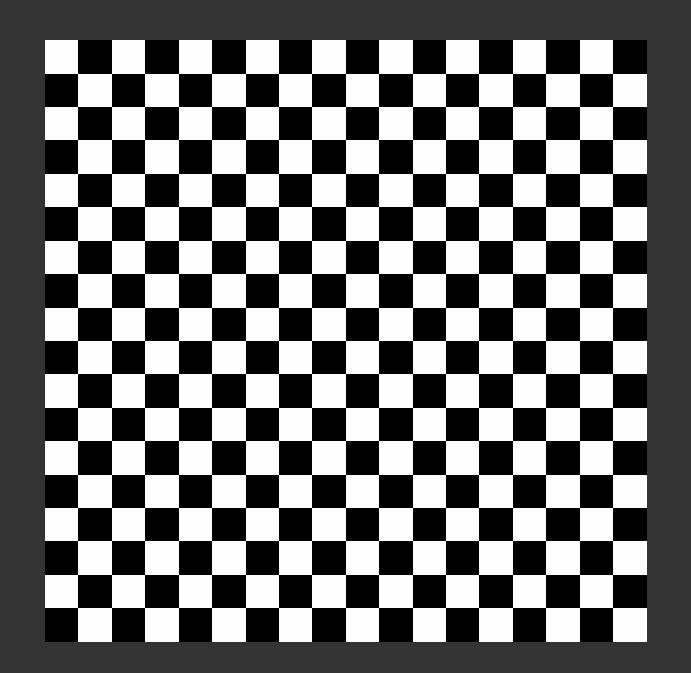
A new procedural pattern has been added to create a simple 2 colored checkerboard
The Jitter Color Adjustment applies random color variation within a range.
The signal used for jittering the color (such as a noise or another map) needs to be supplied via the Nodegaph.
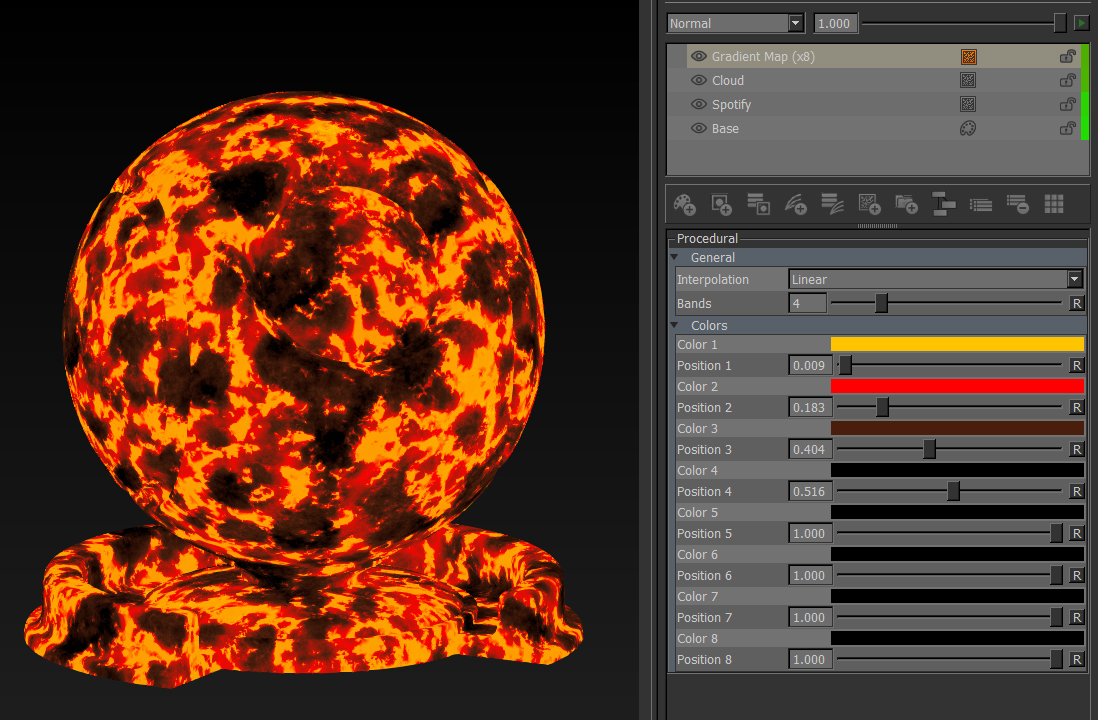
The Gradient Map Adjustment Node is a workaround to Mari's lack of proper Ramps/Gradients.
It provides you with a gradient with a maximum of 8 individual colors to remap your input with.
 7
7
Swizzle is an improved Shuffle Node with the additional option to set a channel to black (Zero) or white (One).
It mimics the swizzle feature found under the Advanced Layer Blend Mode Options.

The Exposure Node allows you to adjust the Exposure of your Input.
A handy FStop Chart is included in case you are more used to setting Exposure in Stops.

alRemapColor is a powerful color correction node, mimicking exact results and order of operations of alRemapColor
(Anders Langlands Arnold alShaders)

alRemapFloat is a powerful value remapping node, mimicking exact results and order of operations of alRemapFloat
(Anders Langlands Arnold alShaders)
Adjust the Range and Position of the Input Histogram. Acts like its Substance Designer counterpart.
Shift the position of the histogram. Acts like its Substance Designer counterpart.

Allows you to select a value range from a greyscale input. Acts like its Substance Designer counterpart.
Maximize Value will offset the RGB Colors until one of them reaches a value of 1.0 based on a chosen
allgorithm (average, corrected, maximum).
This has a variety of applications but most notably for Specular Color creation for metallic surfaces.
Replace Color allows you to pick a color or color range and replace it with a target color


NANs are infinite values that can be introduced by corrupted pixels. While not very frequent, having textures with NANs can cause
havoc in rendering and be time consuming to fix.
The Fix NAN Node will remove all bad pixels automatically and replace them with a specified color.

The Surface Normal to Eye Space Node is a technical node, that for example allows you to make modifications to the way Mari Shaders
are processing Normal Information.
A Number of specular Utility Adjustments have been added to convert specular values.
In addition to their 'Adjustment' functionality of converting values fed in from other layers or nodes,
these nodes also offer the ability to manually input values for conversion.
will convert a reflectance percentage (0-1) to an IOR Value.
E.g. a reflectance of 0.04 (4%) equals an IOR of 1.5.
Optionally the source value can be entered directly in Nodes Properties
will convert an IOR Value to a 0-1 reflectance percentage.
Optionally the source value can be entered directly in Nodes Properties
will convert a 0-1 specular level map (for example out of substance) to an IOR Value.
specular Level Maps are applicable to dielectric materials only.
will convert an IOR Value to a specular Level Value.
specular Level Maps are applicable to dielectric materials only and can be used for example
in UNREAL, Substance or the MARI Unreal Shader.
UDIM Range to Mask outputs a black and white Mask for a defined range of UDIMs
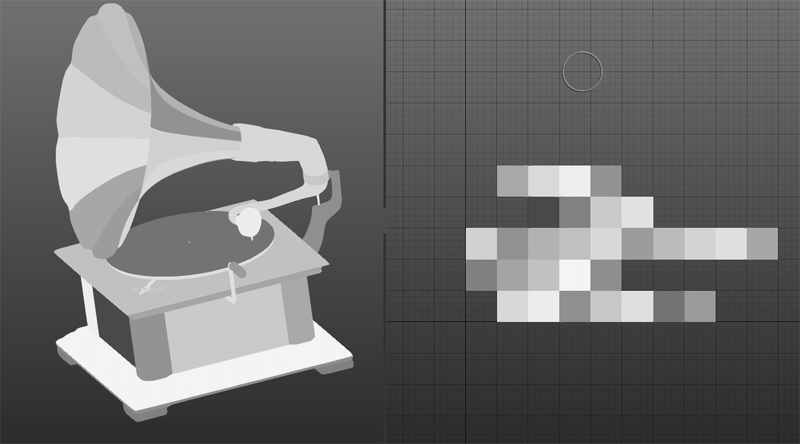
UDIM Value outputs one of the following depending on the chosen setting.
This can be used for a variety of per udim randomization.
- Random Value (0-1) per UDIM
- Random Color per UDIM
- UDIM Number as Intensity Value
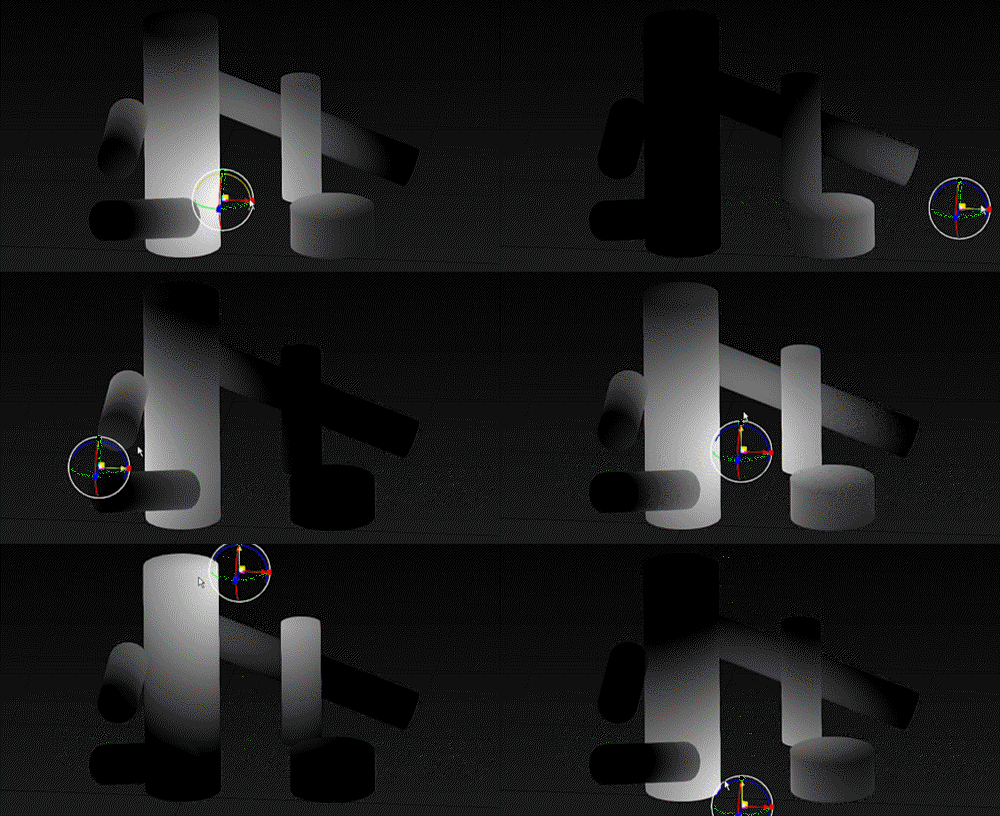
The Manifold by Locator Node takes transformations from a Locator gizmo.
This can be used to adjust the scaling, translation and rotation of noises, tiled nodes,
image nodes etc. by attaching the node to a Position, Manifold or UV Handle in the Nodegraph and modifying
the locators transform gizmo in the viewport.
New locator features from the Manifold by Locator Node have also been added to the Manifold UV and Manifold 3D Node
which are specifically designed to work best with either UV or 3D Transformations

Channel Nodes offer ways to deal with individual color channels and 'pack' them together into a single output.
The nodes are the Nodegraph equivalent to the Add Packed Channel Functionality for the Layerstack (see above)
The RGBA Merge Node is the Nodegraph version of the Extension Pack Add Packed Channel Functionality
and allows you to map 4 unique source inputs into the Red, Green, Blue and Alpha Channel of the Output
The RGBA Split Node allows you to separate the Red, Green, Blue and Alpha Channel into 4 unique Outputs
The RGB-A Merge Node is similar to the RGBA Merge Node above. It allows you to map the RGB channels from one source
and one channel from another source into a combined RGBA Output
The RGB-A Split Node will split your input into 2 Outputs - one RGB Output and one Alpha Channel Output
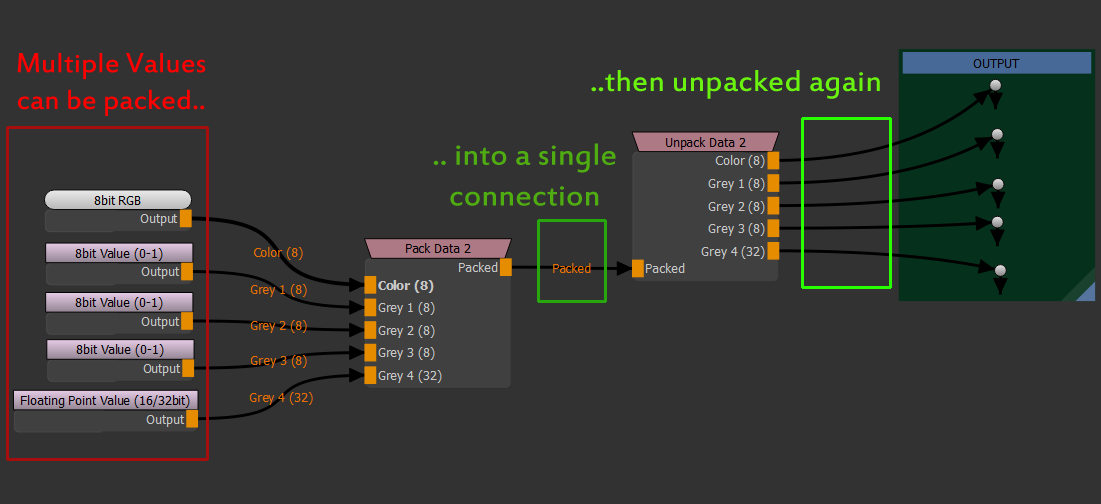
The Pack Data Node allows you to pack multiple values into a single node output, while the Unpack Data Node can
separate these values again.
This can be useful to output the information of multiple nodes from a Graph Group/Gizmo for example to build little Material Gizmos.
A full Text Tool has been added, allowing you to quickly generate text in the Paint Buffer or as a PaintThrough Image


New options have been added to the 'Mirroring' Toolbar.
Utilizing two successive bakes, you can now project your paint across a symmetry plane onto the other side of the model
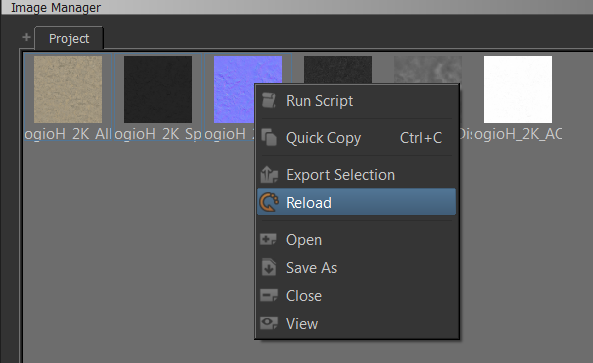
You can now reload an image from its original path, updating the imported version within Mari.
Changes to the file on disc will be propagated to all instances where the image is used within Mari both in layerstack and nodegraph
(tiled, triplanars etc.).

Two new options were added to the new 'Layers / Edit' Submenu in the Layer Menu that make it possible
to copy and paste layers and channel layers with all shared connections intact (including contents of mask & adjustment stacks)

The default Mari Masking Tools found under Layer / Layer Mask / Add Mask have been replaced including:
- Reveal All
- Hide All
- From Alpha
- From Selection
- From Selection Group
The new Extension Pack Versions of the tools are mimicking some behavior found in Substance Painter.
- The Mask Tools will no longer be disabled/greyed out when a mask or mask stack already exists on the layer
- When executed on a layer with a pre-existing mask, the mask will be removed and a new one added
depending on the tool executed
- When executed on a layer with a pre-existing mask stack, the mask stack will be removed and a new one added
depending on the tool executed

A new tool was added to easily create one or multiple packed Channels.
Packed Channels are channels that contain different information in the Red, Green, Blue and Alpha Channel.
A sample usage could be your Roughness Channel in RED, a Metalness Channel in GREEN, Ambient Occlusion in BLUE etc.
This allows a reduction in amount of texture files and memory used .
A new tool was added to the available Export options in the Channel Palette to help with fast iterating of work.
Repeat Last Custom Channel Export will execute exactly the same Export (same channels, same path, same settings etc.)
that was last ran in the current project via Export Custom Channel Selection, without any dialogs or pop-ups.
For convenience a shortcut SHIFT + R has been set (if not otherwise in use) and an icon  has been added to the bottom of the
channel palette.
- Repeat Uses Original Selection
A checkbox was added to the available Export options in the Channel Palette.
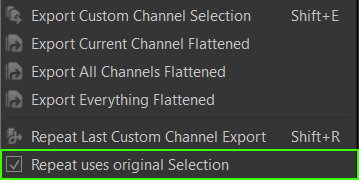
If checked and the last Export was run using 'Export Selected Patches', Repeat Last Custom Channel Export
will restore the previous patch selection for Export. Otherwise the Export will be repeated but with the current Selection.
The state of the Checkbox is remembered across sessions.
New tools were added to the Channel Menu to frame and select your channel and/or the channel content in the Nodegraph:
- Focus Channel
- Focus Channel Content
A number of new tools have been added to the selection group right mouse click menu:
- Hide / Show All
- Hide Unselected
- Invert Visibility
- Lock / Unlock All
- Remove All containing Name
- Remove All
- Search and Replace in Group Names
- Set Custom ID Color
Shader Presets allow you to store the configuration of a shader (slider settings, colors, channel assignments).
The next time you create a shader with a name matching a previously saved preset, all parameters will be restored and
if channels matching a name used in the preset are found in your project they will be mapped to the correct shader input.
A System was added to the Nodegraph that allows you to quickly overwrite the currently active's shaders channels with a node selection
in order to isolate parts of a material and view it shaded.
Set Nodes to Shader is part of the Shader Preset system and allows you to quickly preview your node selection with a shader, making
it act like a 'isolate select' for materials.
It works by scanning the selected Node Names for matching name parts against Channel Names that have been previously saved as Shader Inputs
via the Save Shader Preset Tool in the Shaders Palette
When nodes with (partially) matching names are selected when Set Nodes to Shader is launched, the nodes will replace the Inputs
of the selected shader while all other shader Inputs are cleared.
If Set Nodes to Shader is launched without any selected nodes the selected Shader will revert itself to the Shader Inputs that were mapped to the shader
immediately before Set Nodes to Shader was last executed.
Reset Shader is part of the Set Nodes to Shader Tool.
It allows you to reset the Inputs of your selected Shader to the connections it had before Set Nodes to Shader was launched the first time
for this particular shader.
The new radio node system allows you to easily share node data from one point in your graph to another,
without cluttering up your nodegraph with crossing lines.
Hiding and unhiding a connection to a radio node
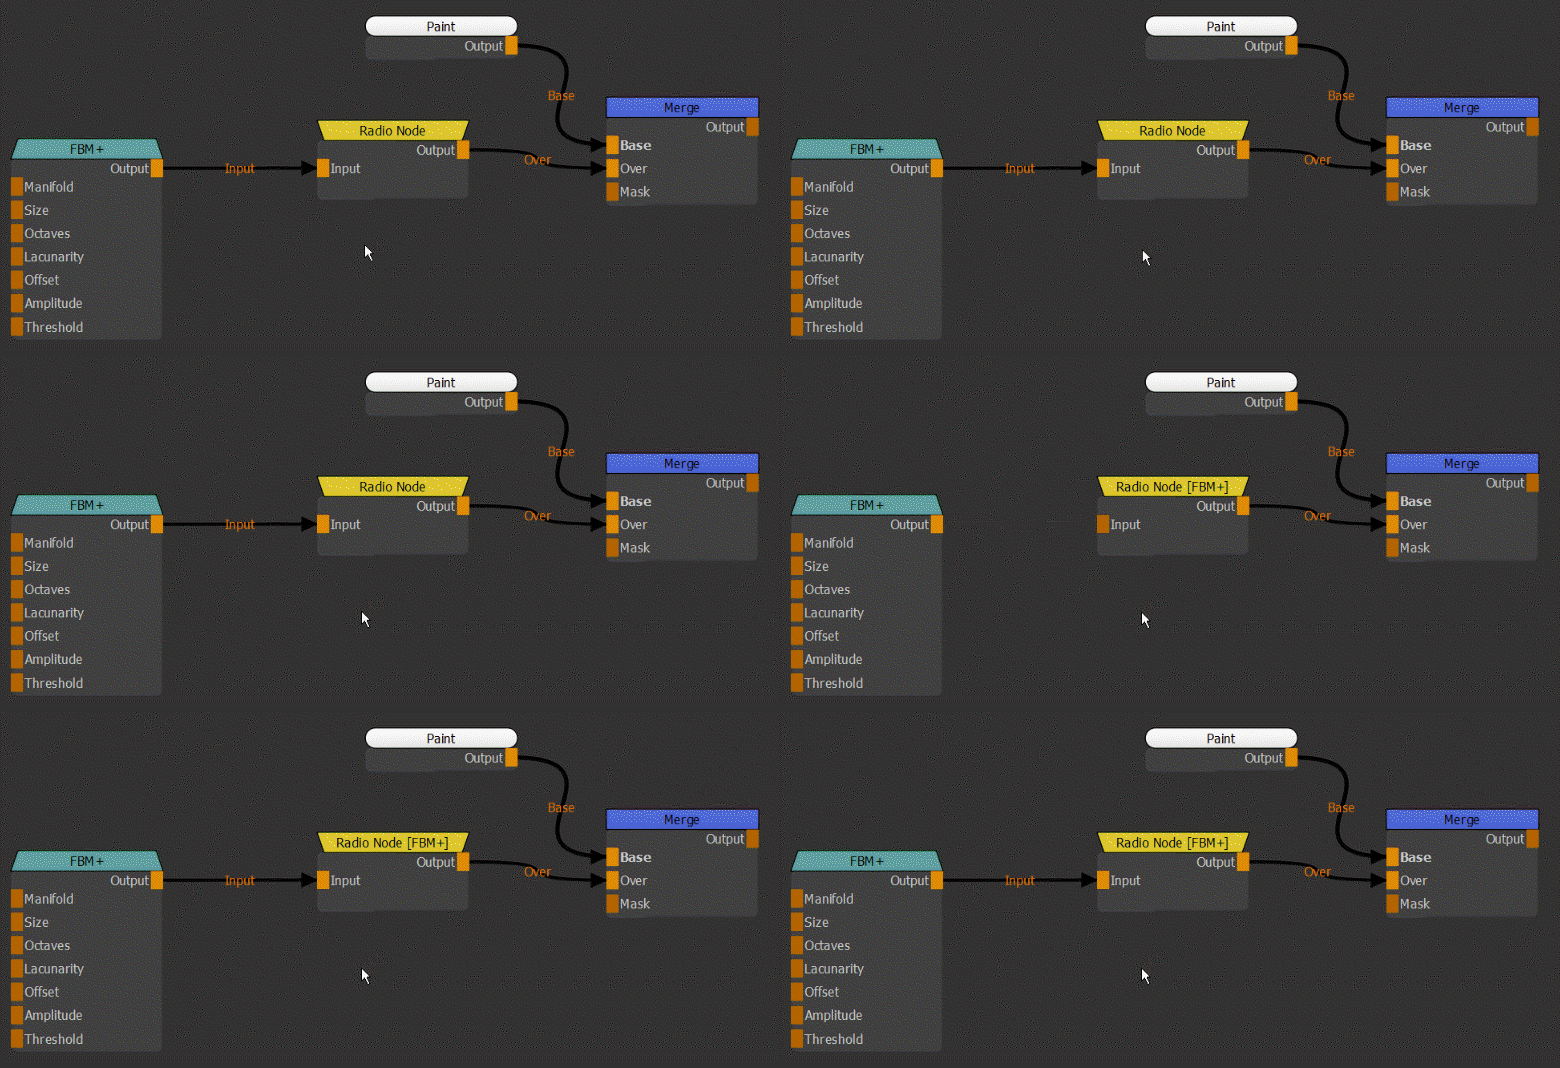
A new node type Radio Node was added under Nodegraph/Nodes/Misc/.
The Radio Node behaves like a dot node allowing you to redirect its input to another position in the nodegraph.
A new Menu Item Toggle Radio Nodes' was added under Nodegraph/Edit/.
Toggle Radio Nodes will hide or unhide the Input connection of any selected Radio Nodes.
If no Radio Node is selected in your Nodegraph, it will toggle between hiding and unhiding
Connections for all Radio Nodes in your Nodegraph.
The options below have been added for consistency but not been exposed in the Nodegraph User Interface.
They are available as entries in the Hotkey Editor and in the Scripts/Nodegraph/Radio Nodes/ Menu
A new node type Radio Transmitter was added under Nodegraph/Nodes/Misc/.
The Radio Transmitter is a special Node that can be called from the Connect to Transmitter Tool .
With a Radio Node selected, the Connect to Transmitter Tool will allow you to select a Radio Transmitter
from a list of all available Transmitters in your Nodegraph and automatically connect the selected Radio Node
to the selected Transmitter.
Connecting a selected Radio Node to a previously created Radio Transmitter Node via the Right Mouse Click / Misc / Connect to Transmitter Dialog

When nodes/node networks containing Radio Nodes without connections, are imported into a project,
the Radio Nodes will try to connect to a Transmitter Node matching the Name of the Transmitter
that was previously attached to the Radio Node when it was exported.
This allows you for example to automatically connect imported node networks to utility channels /nodes such as
Occluson, Curvature, Material ID Maps etc.
Automatic Reconnecting of Radio Nodes to Transmitters based on Name

A Nodegraph Bookmark System was added, consisting of a Bookmark Node and several Menu commands to cycle your view through different
bookmark positions in your nodegraph or directly jump to a specific bookmark.
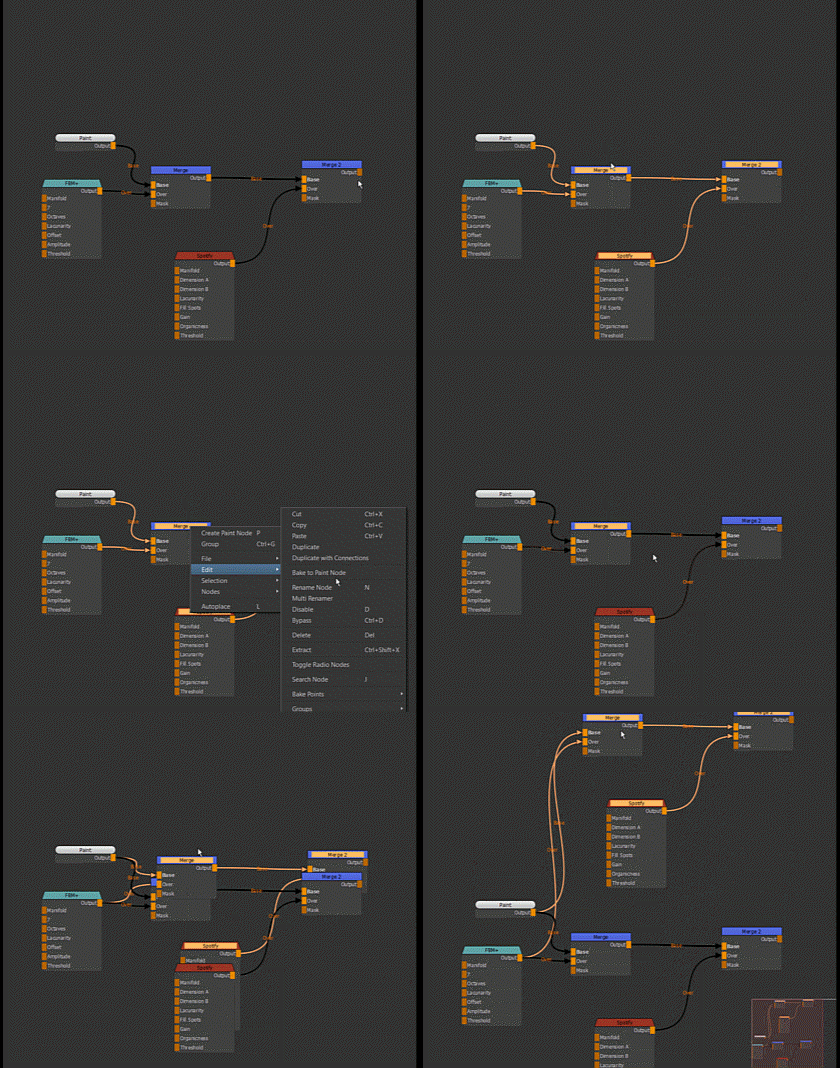
Duplicate with Connections will create a copy of the selected chain of nodes while maintaining all connections
to unselected nodes.
New tools have been added to a new Selection Submenu in the Nodegraph right mouse click menu:

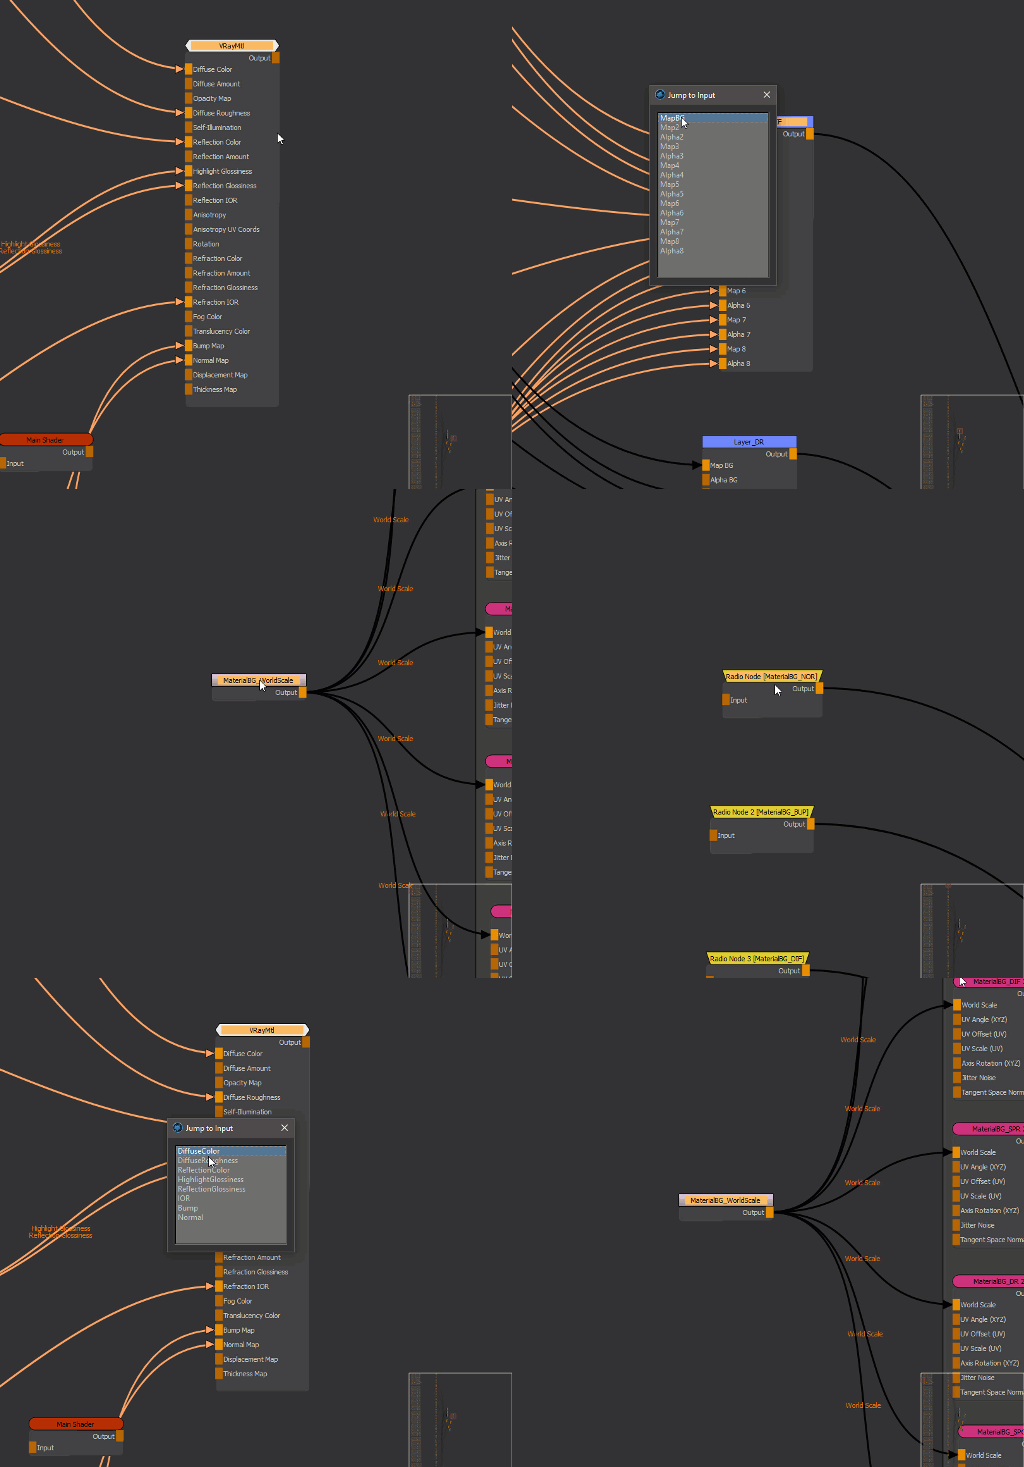
Jump To Node Input and Jump to Node Output allow you to quickly move your Nodegraph Focus to the node connected to a
node's Input or Output.
Using the Jump To Actions to traverse a Node Chain
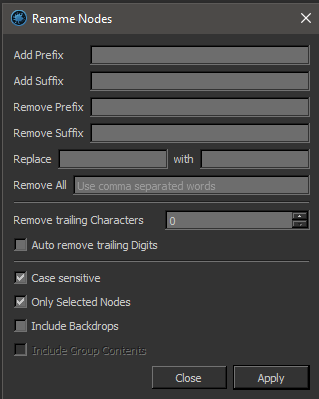
The Multi Renamer allows you to rename multiple nodes with options for search/replace, prefix and suffix and trailing character management.
Smart Rename will rename selected Nodes based on the Names of Nodes upstream
The options below have been added for consistency but not been exposed in the Nodegraph User Interface.
They are available as entries in the Hotkey Editor and in the Scripts/Nodegraph/Bake Points/ Menu
- Set 'Use Bake (on)'
- Set 'Use Bake (off)'
- Bake Selected Bake Points
The default MARI Subdivide Dialog accessible via the Object Menu has been replaced.
The new dialog allows you to batch subdivide multiple objects.
The Dialog can now also be launched via a new Icon at the bottom of the Object Palette.
The standard MARI Subdivide Dialog is still displayed when right clicking on an object in the
Object Palette and choosing Subdivide from the context menu.
|
|
The highest available subdivision level has been increased from 3 to 5 when using this dialog |
Extension Pack now ships with several default Objects that can be easily added to your project
via the Object Menu.
- Tiling Plane 2x2
- Tiling Plane 3x3
- Plane
- Highres Plane
- Cube
- Round Corners Cube
- Sphere
- Cylinder
- Shader Ball
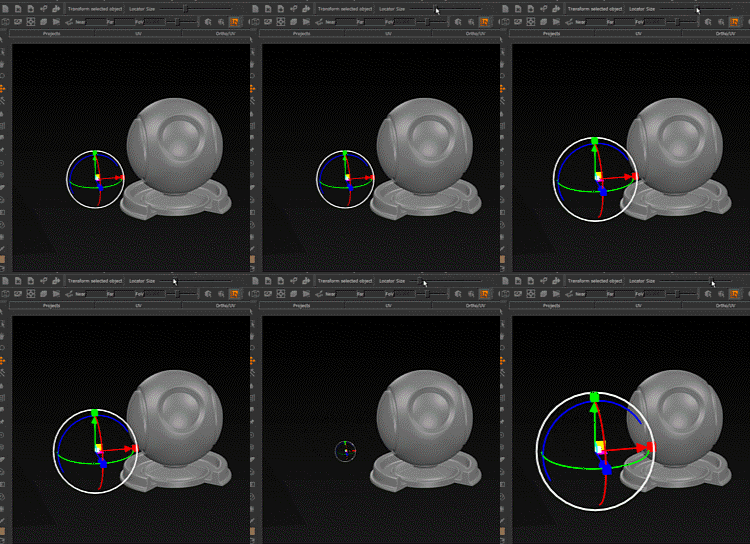
A new slider Locator Size was added to the Tool Properties Toolbar of the Transform Selected Object
Tool. This let's you adjust the size of locators in the viewport
In addition to the previously released Quick Unproject Channel and Quick Unproject Layer a new
Quick Unproject View has been added.
This will unproject whatever is currently in your viewport to the Image Manager therefore allowing you to unproject from a
Nodegraph View as well.
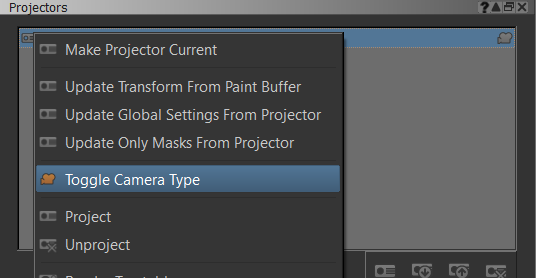
You can now toggle the camera type of the currently selected projector between perspective and orthographic
even after the projector has been created/loaded
|
FEATURE IMPROVEMENTS |
Click on a feature for more information
- Nodes
- Extension Pack Nodes now follow a consistent Color & Shape Coding Scheme
- Channel Palette
The following channel specific commands are now available as icons at the bottom of the channel palette:
![]()
- Duplicate Channel
- Import into new Channel
- Repeat Last Custom Channel Export
- Export Custom Channel Selection
The following channel specific commands have been relocated into a new 'Channels / Locking' Submenu (![]() )
)
- Lock Channel
- Unlock Channel
- Lock All Channels
- Unlock All Channels
- Object Palette
The following object specific commands are now available as icons at the bottom of the object palette:
![]()
- Export Geometry
- Add Version
- Remove Version
- Subdivide Objects
- Calculate Ambient Occlusion
- Layer Palette
The following Layer specific commands have been relocated into a new 'Layers / Edit' Submenu
- Cut
- Copy
- Paste
- Project Tab

- The Project Tab has been extended to include information about archiving of projects.
Projects that have been archived and have not been changed since will now display a green icon in the corner
when mari is launched the next time.
- The Project Tooltip has been extended with additional information about archiving
- Archived (true/false)
If the project has ever been archived (even if the archive is out of date) this will display true
- Archive Date
The Date of the last archiving
- UpToDate (true/false)
If the project on disc is the same as the archive this will display true and a
green icon will be visible in the thumbnail

- Hotkeys
 On Mari Startup, Extension Pack will now automatically transfer hotkeys from default Mari Actions to their Extension Pack counterparts
(e.g. 'Convert to Paintable', 'Lock Channel' etc.) unless a hotkey is already assigned. This is to avoid users by mistake trying to assign
a hotkey to a menu action that has since been replaced with a Extension Pack version of the tool.
- Misc
- All Extension Pack Dialogs have had their UI skins improved
- Filter mechanisms (for channel lists, object lists, selection group lists etc.) in a number of dialogs have been improved.

- You can now turn the Filtering on and off
- You can now set the Filter to 'match' or 'does not match'
- Filtering can now be switched between case-sensitive and case-insensitive
- You can now add multiple keywords to the Filter by separating them with a comma (,).
- All Extension Pack Tools have been improved to give better Status & Error Report Messages
|
|
TOOL OPTIONS FROM PREVIOUS EXTENSION PACK VERSIONS NOT RESTORED Tool Options (paths, checkbox on/off states etc) are now saved under a new version in the Mari Config File. This means that on loading of the tools for the first time your Settings will not be set the same way you had them set in a previous Extension Pack Version. This is an intentional change to avoid conflicts with old versions. |
- You can now specify Export Colorspaces. By default each channel's setting from the Channel Palette is read.
- You can now force export a channel to a specified bit depth
- You can now export to EXR (min.16bit), JPG,TGA,PNG and ICO (max 8bit) file formats regardless of the bitDepth of your channel.
Using the new 'Dynamic' BitDepth option, your channel is exported at the bitDepth it is in your project
unless the specified file format requires a minimum or maximum bitDepth
- You can now configure EXR File Compression
- You can now store presets of which channels to export. For convenience the following default presets have been added:
- Clear Export List
- Selected Channels Only
- Last Exported Channels
- Last Exported Channels (all objects)
The channel currently selected in your project is now added by default to the right-hand list of channels to export as long as
the 'Selected Channels only' Preset is the default.
You can configure your own default preset that is loaded each time you launch the exporter by clicking the 'Set as Default' button.
- You can now set the current path and/or current template as the default for the current project.This is identical to configuring them via the
Set Project Paths Tool. Any time you load the project, the settings will be restored
- A reset button was added to reset the export path field to the project default texture export path
- A new 'Save before Export' Option was added. When ticked on, Mari will save your project before any baking/exporting.
- A new 'Export in Background' Option was added. When ticked on, Mari will save files using its background exporter freeing up
Export Custom Channel Selection to bake and export the next channel in the list while the other channel still gets saved to disc.
- 'Full Patch Bleed' Checkbox is now off by default, mimicking defaults of previous Extension Pack Versions.
While it is often recommended to have it on (once ticked it is remembered between sessions),
Maris standard Export Tools do not utilize 'Full Patch Bleed' making an export from Export Custom Channel Selection seemingly much slower than
one performed with default Mari tools.
- The Object Name in front of channels will now only be displayed if List all Objects Checkbox is turned on
- Channels that have already been added to the Export list are now marked in Bold in the full Channel List on the left side.
- 'Only Modified Textures' checkbox has been renamed to 'Only modified UDIMs' for clarity
- A button has been added to the middle section of the dialog to clear the channel export list
- A button has been added to the middle section of the dialog to add all (filtered) channels to the channel export list.
The previously existing Export Everything Checkbox was removed.
- The active setting for 'Export Resolution' as well as the new 'Export Bitdepth' is now saved and restored between sessions
- Changes to the Template field are no longer remembered between sessions since it caused too many user errors inside pipelines
with strict naming conventions.
The field will revert back to the Project Default each time the export dialog is launched.
To save a change to the Template Field for the current Project, use the new 'Set Template as Default' Button.
- Before being able to set a Post Process command, a number of sanity checks are now performed to detect possible errors
- Channels that have an empty Layerstack but have a full Node Network attached to them will now still Export.
 'Export Custom Channel Selection' will now record the state of each UDIM on each Export regardless if 'Only Modified UDIMs'
Export Option is turned on or not. This means you can turn 'Only Modified UDIMs' on at any time and it will take the last Export into consideration.
 'Only Modified UDIMs' option is now fully Nodegraph aware (including Bake Points)
- During export a window now shows which channel Mari is processing and how many channels are left to export.
- Canceling one export in the Mari Main Window by pressing the 'X' button in the status bar (lower right hand corner) or pressing
ESC will now cancel all subsequent queued exports.
- Success and Error Reporting has been improved, giving possible solutions to errors, listing export paths, exported channels,
export times, post processes etc. This information is available in the message details as well as printed to the Python Console.
- Tooltip Information was improved
- Export Custom Channel Selection Icon was added to the bottom of the Channel Palette for easier access
- A default Hotkey Shift+E is now set to launch the Export Dialog unless the Hotkey is already in use
- New options have been added to control channel duplication and naming
- The Object Name in front of channels will now only be displayed if List all Objects Checkbox is turned on
- Channels that have already been added to the Flatten list are now marked in Bold in the full Channel List on the left side.
- A button has been added to the middle section of the dialog to clear the channel to flatten list
- The active Channel is now by default added to the right hand list of channels to flatten
 'Duplicate Channel' now fully supports Channels that have been partially or fully authored in the
Nodegraph, maintaining shared connections, radio node connections etc. on duplication.
- Export Object now supports a Version Variable you can use in Path and Filename.
If a variable is used in the Filepath the tool will create the necessary folders for you.
- $VERSION
The Name of the Object Version as it appears in the Version Dropdown in the Object Palette.
This name can be changed by right-mouse-clicking on an object and choosing 'Rename Version'
- A new option 'Save Copy without Subdivison (level0)' was added. In addition to saving the object
in its current (subd'd) state, this will save an additional copy of the object without Subdivision
- You can now set the current path as the default geo export/import path for the current project.
This is identical to configuring them via the Set Project Paths Tool. Any time you load the project, the settings will be restored
- A reset path button was added to reset the path to the project default geometry path
- A button has been added to the middle section of the dialog to clear the export list
- A button has been added to the middle section of the dialog to add all (filtered) objects to the export list
- Checkbox on/off states are now restored based on previous selection when launching the export dialog
- Objects that have already been added to the Export list are now marked in Bold in the full Object List on the left side.
- The active object is now by default added to the right hand list of objects to export
- A progress bar is now visible during export in the right hand corner of the Mari window
- Success and Error Reporting has been improved
- Export UV Mask now supports a Version Variable you can use in Path and Filename.
If a variable is used in the Filepath the tool will create the necessary folders for you.
- $VERSION
The Name of the Object Version as it appears in the Version Dropdown in the Object Palette.
This name can be changed by right-mouse-clicking on an object and choosing 'Rename Version'
- A checkbox was added to save the UV Masks with unsubdivided UVs (level0).
This will temporarily reset all subdivided objects to Level 0 to export their UV Masks
- You can now set the current path as the default texture export path for the current project.
This is identical to configuring them via the Set Project Paths Tool. Any time you load the project, the settings will be restored
- A reset path button was added to reset it to the project default texture export path
- A button has been added to the middle section of the dialog to clear the export list
- A button has been added to the middle section of the dialog to add all (filtered) objects to the export list
- Objects that have already been added to the Export list are now marked in Bold in the full Object List on the left side.
- The active object is now by default added to the right hand list of objects to export
- Success and Error Reporting has been improved
- A Progress Dialog has been added
- You can now cancel all Material ID Map Processes at once using ESC instead of having to abort them one by one
- The algorithm to generate ID Maps has been improved resulting in more readable ID Maps
- You can now reuse the previously baked ID Colors, if a selection group is rebaked
- You can now set custom ID Colors
- The UI now remembers settings between sessions
- Quick Unproject Images are now by default loaded into an Image Manager Tab 'Quick Unproject'
- Quick Unproject Images are now by default saved as minimum 16bit EXR Files to avoid any possibility of
image degradation/banding due to Color Management. If you are unprojecting from a 32bit channel, the resulting
file will also be 32bit.
- Unprojected images are now saved with Colorspace 'raw'. Once loaded back into the image manager they inherit
the Color Management from their source channel.
- Quick Unproject will now store images in the Path specified for Quick Unprojects in the Set Project Path Tool

 The Axis Projection Node can now be switched to different Tiliing Modes

 You can now set the default Alignment of the Projection based on the Object Bounding Box (Center, Top, Bottom)
- You can now rotate the projected image separately for each of the three major axis (XYZ) via separate sliders.
- World Axis Rotation Parameters have been exposed as a node port in the Nodegraph
 so they can be driven by other nodes
- The Jitter Parameter has been split into two sliders: Jitter Intensity and Jitter Size
- A new 'Jitter Noise' Port has been exposed on the node in the Nodegraph
 . Mapping this port allows you to override
the internally used noise signal to jitter the blending of edges

- The exposed 'UV Angle' Port in the Nodegraph was previously using the red channel of a connected node to change the image rotation
for all three projection sides.
The port is now evaluating the Red, Green and Blue Channel (X Y Z) of a connected Node to allow driving Image rotation separately
for each projection side.
- UI Order and Grouping has been changed to give faster access to frequently used items
- The Node has been renamed from its previous Texture Scatter 2D (Tileable) to Texture Scatter 2D X4 indicating that it has
4 Texture Slots as opposed to the newly addedTexture Scatter 2D X1 Node which only has one slot.
- A new Base Color Attribute was added that allows you to completely fill the first layer of the node with a constant color.
- A Variety of UV related Options have been added:
- UV Repeat - a great way to add higher density without the added cost of computing more scattered cells
- U / V Scale - allowing you to squash and stretch your cells
- UV Rotation - A global rotation for the result of the computation in addition to the per cell rotation options
- UV Offset - Translate the finished result in UV Space
- Per UDIM Pivot - If ticked on (default behavior) UV scaling & rotation will be applied with a pivot at each UDIMs center
otherwise the pivot for all UDIMs will be at the base of UDIM 1001 (![]() )
)
- A Manifold Connection was exposed on the Node in the Nodegraph
- You can now jitter the shape of each cell by attaching a noise or similar to one of the 'Edge' ports in the Nodegraph
 . This helps to break up artificial
looking 'stamping' patterns introduced when using the Edge Falloff Settings in the Texture Slot(s).
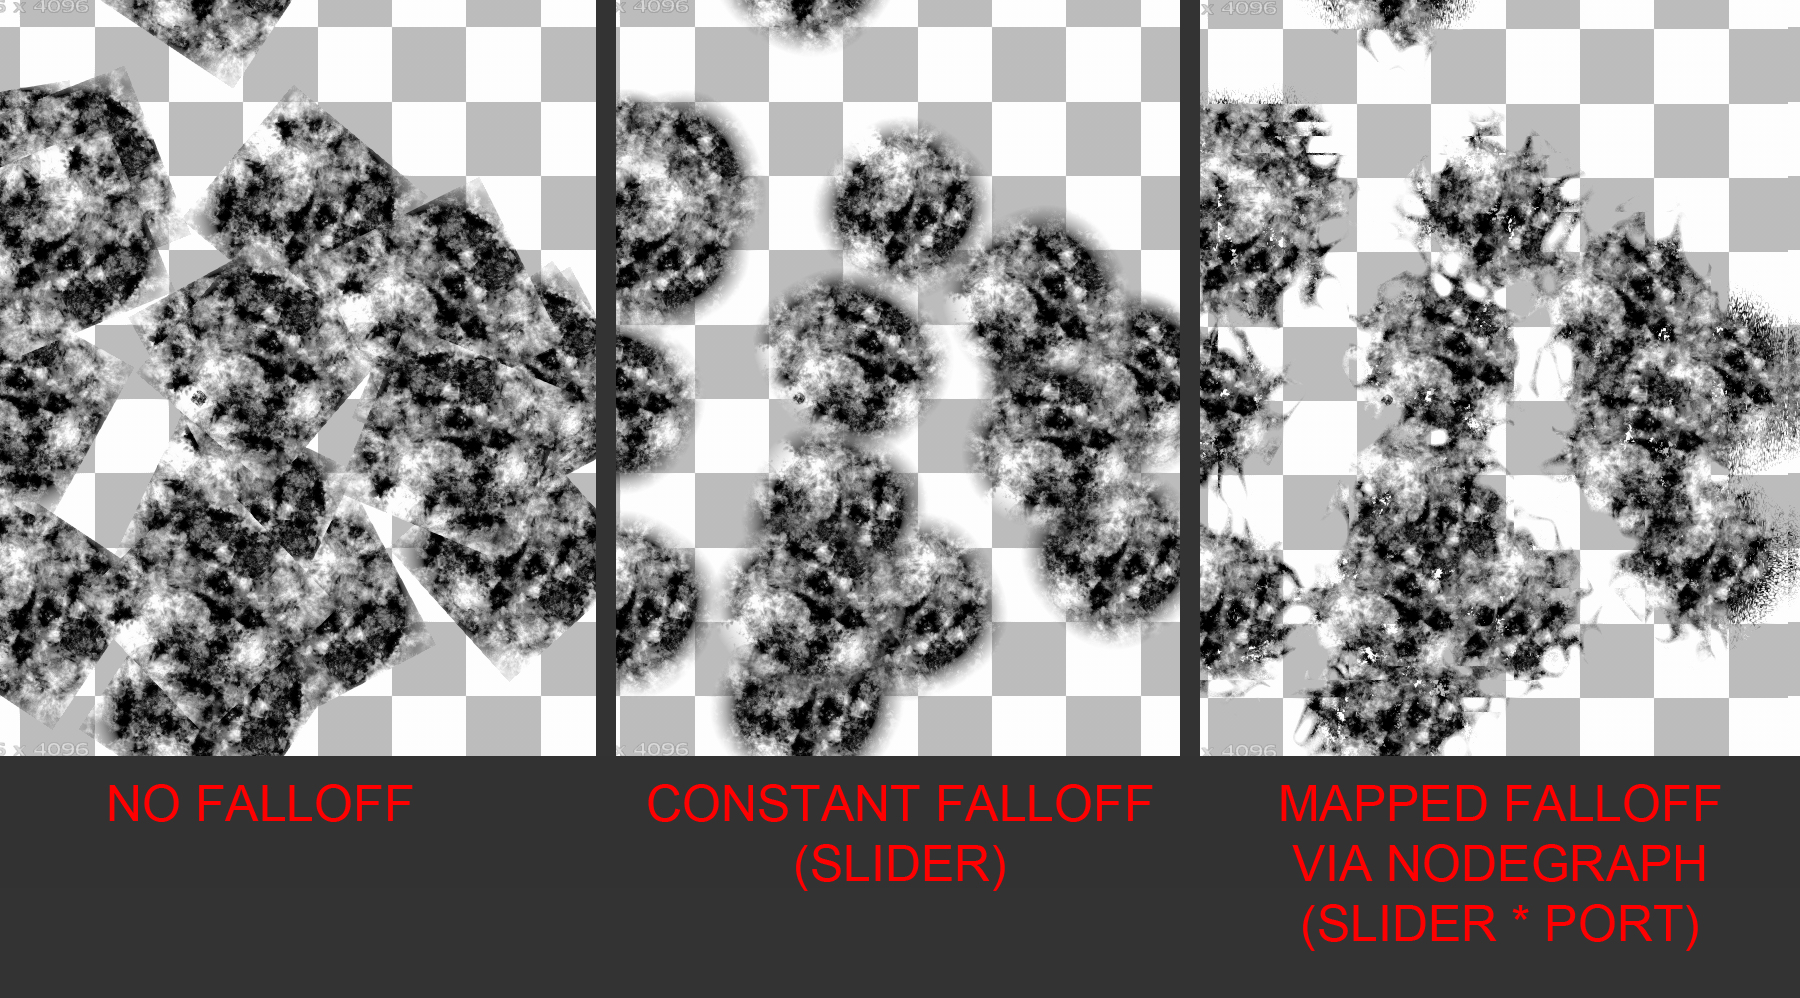
- A new Base Color Attribute was added that allows you to completely fill the first layer of the node with a constant color.
- The group names and UI has been adjusted to give better access to frequently used items
|
|
DO NOT KEEP TEXTURE SCATTER NODES LIVE The various Texture Scatter Nodes of Extension Pack are not meant to stay live in your scene. Utilize Caching,Bake Points or Convert to Paintable after you have a satisfying result to keep performance up. |
 The Image Node can now be switched between different Tiling Modes
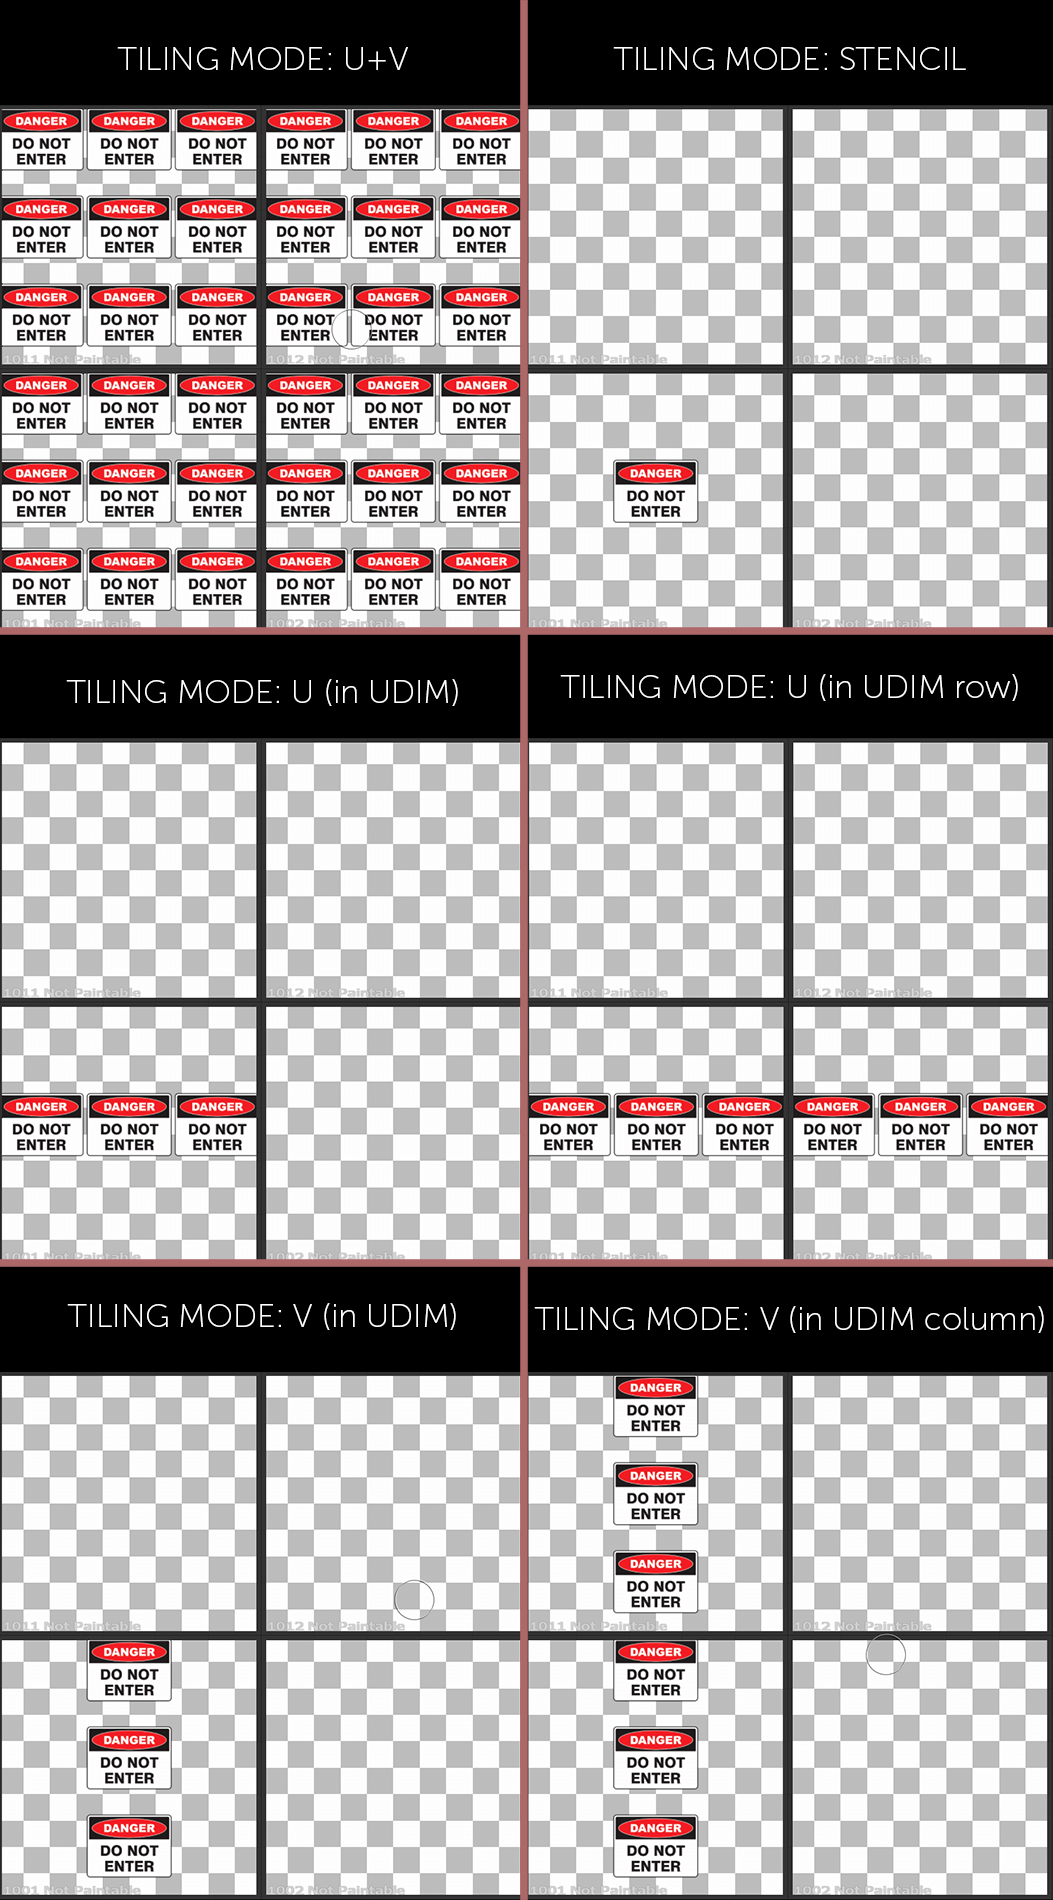
- Positioning the Cylindrical Projection in 3D Space has been greatly simplified using visual transform aids (locators) in the Viewport
- Positioning the Object Space Radial Gradient in 3D Space has been greatly simplified using visual transform aids (locators) in the Viewport
- The Node is now simply called Mix instead of Mix (Lerp)
- The Mix Node will now show the result of Input A if no Input B exists
- Color A and Color B Selection in the Node Properties have been removed to make the node lighter.
Existing Mari Project will not be affected.
- You can now select a locator from the object palette within the Manifold 3D Node.
By adjusting the Locator's Transform Gizmo in the Viewport you can visually change scale, rotation and
translation of nodes attached to the Manifold 3D Node (Noises etc.)
- You can now select locators from the object palette within the Manifold UV Node.
By adjusting the Locator's Transform Gizmo in the Viewport you can visually change scale, rotation and
translation of nodes attached to the Manifold UV Node (Tiled Node, Image Node etc.)
 New 'Transform Pivot' Options were added to the Manifold UV Node. With Per Udim Pivot turned on the transform pivot will
sit at 0.5/0.5 of each UDIM . By modifying the pivot u and v setting you can shift the transform pivot to an arbitrary position.
This is similar to Photoshop Transform Tool where you can move the transform pivot around.

 A new 'Per UDIM Pivot' Option was added to the Manifold UV Node.
When on all UV Transformations will be performed with a transform pivot at each individual UDIM (as determine by the Transform Pivot Position)
By turning 'Per UDIM Pivot' off UV transformations will behave more similar to Maris default TILED Node and
work better with UV Shells spanning across multiple UDIMs without cuts.
UV Transformations applied to multiple UDIMs with perUDIM Pivot On (left) and off (right)


- A Manifold Connection was exposed on the Node.
Using the Nodegraph or GraphLayers you can now use attached Manifold Nodes (2d, 3d or locator manifold) to transform
the Surface Normal.
- Instead of an exclusively Black and White Mask you can now set the used colors via the new 'Color A' and 'Color B'
- UI Order and Grouping has been changed to give faster access to frequently used items
- Axis Rotation Parameters have been exposed as a node port in the Nodegraph so they can be driven by other nodes
- The Jitter Parameter has been split into two sliders: Jitter Intensity and Jitter Size
- A new 'Jitter Noise' Port has been exposed on the node in the Nodegraph. Mapping this port allows you to override
the internally used noise signal to jitter the blending of edges with your own noise type
- The previous 'Black is Transparent' Checkbox has been removed since you can now use the new Color A/B Fields
|
|
ATTENTION The removal of the 'Back is Transparent' Checkbox can result in look changes in existing projects where the option was ticked. In these cases please use the new 'Color A' and 'Color B' Option Boxes to set the Background Color to Transparent using the Mari Color Picker Dialog. |
- A 'Clamp' Attribute was added to the 'Grade Mode' Group of the Color Range to Mask Node.
When ticked this will prevent the grading from being able to produce values above 1 or below 0.
- A Manifold Connection was exposed on the Node.
Using Nodegraph ![]() or GraphLayers you can now use attached Manifold Nodes (2d, 3d or locator manifold) to transform
or GraphLayers you can now use attached Manifold Nodes (2d, 3d or locator manifold) to transform
the Surface Normal.
- A Scalar Checkbox was added. If turned off, the entered upper and lower bound values are treated as sRGB Values and
converted to linear first before being used for value testing.
- Illegal Value Warning now has a NAN (Not-A-Number) Debug Mode

- A 'Clamp Intermediary' Checkbox has been added. This will clamp the result of the 'Old Min / Max' before further
processing with the 'New Min / Max' Values
Checking this option will ensure that the 'New Min / Max' Values are indeed the lowest / highest values that are output
from the Node when the 'Old Min / Max' have been modified.
- An additional 'IOR' Slot was added to the SpecGloss (SG) Material Regions
- F0 Specular has been renamed to Specular Level for consistency with common programs
- An additional 'out IOR' Slot was added, that will generate correct IOR Values based on the
reflectance and metalness of your input
- A new checkbox "Set Non-Metallic Specular to White" was added to the node (unchecked by default)
When checked, non-metallic areas of the Out_Specular will be white.
Otherwise the corresponding reflectance value for the input Specular Level will be used (0.0 - 0.08).
For most applications the default reflectance value should be used.
- The conversion to Reflectance Values has been adjusted to provide greater precision in values.
- The Extension Pack Versions of standard Mari Noises (Legacy Cloud, Legacy Cellular etc.) have been renamed in order to appear together
with the Mari Version of the Noise when using TAB to create them.
- Cloud (extended)
- Cellular (extended)
- Perlin (extended)
- Squiggle (extended)
- Turbulence (extended)
 New 'Per UDIM Pivot' Option were added to the 'Space' Group of Fractals/Noises.
When on and in UV Space, all UV Transformations will be performed with a transform center at each individual UDIM.
By turning 'Per UDIM Pivot' off UV transformations for all UDIMs will be performed with a common pivot
at the base of UDIM 1001.
UV Transformations applied to multiple UDIMs with perUDIM Pivot On (left) and off (right).


- Mulit FBM Procedural has been optimized for performance
- Gizmos
- A Nuke Script has been included in the Mask Preset Folder to speed up creation of Curvature Variants for use
with the Mask Presets
- Mask Presets have been updated to use latest node versions and left-to-right nodegraph mode in selected cases
|
BUGFIXES |
Click on a feature for more information
- Misc
- Various Extension Pack Layer Tools gave a 'Layer Selection not found' Message when executed from a floating
or docked Layerstack while the primary selected channel ('current Channel') was completely empty.
This includes the following tools:
- Pinned Layers would sometimes spam the Python console with errors on project load
- On Linux using 'Export Selected Patches' without any patches selected caused a Mari Crash on export
- On Linux having an empty Post Process executable field (while it was turned on) caused a Mari Crash on export
- When exporting non-default channel resolutions (Halve,Quarter etc.) running post processing would cause a Python error or even Mari Crash
- When 'List all Objects' was on, channels sometimes would appear multiple times in the channel list.
- The Exporter was incorrectly giving a 'Export Successful' Message when exporting a 8bit Channel
into EXR Format, despite nothing having been exported at all (since 8bit exports to EXR are not supported by default)
- The Exporter was incorrectly giving a 'Export Successful' Message when exporting a 16 or 32bit Channel
into Fileformats (jpg,ico,tga etc.) that only support 8bit, despite nothing having been exported at all
- No EXR Compression was used by default resulting in unnecessary large files on disc. The exporter now uses the same
EXR Compression you are using when exporting with standard Mari Export Tools.
In addition a dialog was added in the exporter UI to configure the Compression.
- When a Channel Export caused an error during export (due to complexity etc.), the channel would still be marked as having been exported.
The next export with 'Only Modified UDIMs' turned on would then ignore the channel if it had not been
changed in the meantime.
- Due to a Bug in previous Mari Versions, changing Layer Visibility by clicking on the icon did not mark the channel as modified and
'Only Modified UDIMs' could not detect a change. This is now fixed in Mari 3.2v1 and 'Only Modified UDIMs' Export Option works reliably.
- Filtering was ignored when pressing 'List all Objects' until the Filter Field was manually updated by the user
 Launching the Post Process Dialog would sometimes crash Mari
 The Only Modified UDIMs option did not always register changes, when the channel was partially or fully authored in a
nodegraph 'non layer stack compatible' way.
 The Only Modified UDIMs option caused the Exporter to error, when the exported channel contained a layer
with a specific mask stack configuration
 The Only Modified UDIMs option did not register a change and blocked the export, when all that had changed
was the Export Resolution or Export Bit Depth Setting in the Exporter Dialog.
 The Only Modified UDIMs option when used with custom Export Bit Depth or Resolution Settings,
could crash Mari on Channels containing specific Metadata.
 The Only Modified UDIMs option did not register resolution changes on individual UDIMs as a change and blocked
the export
 The Only Modified UDIMs option did not remember the last export when the project was closed and reopened and would
subsequently export all UDIMs again after a project was reopened.
 The Tool did no clean up duplicated nodes after flattening when the duplicated channel was partially or fully authored in the Nodegraph
- When 'List all Objects' was on, channels sometimes would appear multiple times in the channel list.
- A History entry for Duplicate Flatten was created even if the Dialog was canceled
- Filtering was ignored when pressing 'List all Objects' until the Filter Field was manually updated by the user
- In cases of deeply nested Channel Layer Constructs, Duplicate Channel sometimes did not remove all obsolete channels after duplication.
 When used on a Channel authored in the Nodegraph (in a 'non layer stack' compatible way) it did not properly detect shared connections or shared channels,
creating duplicates of the shared connections instead.
- Load Custom Channel Resolution would error when used on an object that at one point in the project had an object version with different,
no longer existing udim numbers.
- Load Custom Channel Resolution could cause the Undo Stack to stop working in some situations
- The User could specify EXR or HDR File format for the UV Masks even though exporting in EXR or HDR is not supported for UV Masks
- Export UV Mask was adding multiple 'Close Image' entries to the Undo History
- Screenshot all Channels will no longer display a warning message when launched.
- After Sync Object Shaders finished, the shader selection on the original object wasn't showing the shader
attributes until the shader was re selected.
- The unprojected image was saved to disc using the OUTPUT Colorspace of the Channel it originated from.
If the OUTPUT Colorspace was using a Gamma Curve (sRGB etc.) there was the possibility of image degradation
when using the unprojected Image to paint again. Unprojected Images are now always saved with Colorspace 'raw'.
- A large number of Extension Pack Nodes would cause an error when used in a Shader Displacement Slot
- A bug was fixed in all Dynamask Presets that was preventing Displacement information to be evaluated correctly
when something was attached to the displacement handle of the Node.
- Misc

- Some adjustment layer nodes were incorrectly setting the alpha of layers with transparency to white,
meaning the transparency would be removed. The following nodes were fixed to now respect transparency:

- The Alpha was unaffected even when the Alpha Channel was ticked on in the Channels Group of the Set Range Node
- The 'Grade Mode / Contrast' Slider was able to affect the contrast of the Alpha Channel

- Newly created Constant Grey nodes now output a value of 0.5 instead of 0.498. The 0.498 value is a leftover from before Mari
introduced color management. In addition a slider has been exposed to set a custom value.
Old instances of the Node will still output the 0.498 value but also have a slider exposed.
- When Setting the Minimum Random Rotation and Maximum Random Rotation both to 0,
the cells, while all having the same rotation value, were all having a rotation other than 0.
- A bug was fixed where the Manifold UV Node was outputting vertically flipped UVs by default.
|
|
ATTENTION This fix will change the look of nodes attached to existing Manifold UV Nodes (Images will flip vertically). To revert to the previous look you need to tick on the Mirror V Checkbox in the Mirror UI Group of the node |
- The Specular Level Output was mistakenly packed together with the Roughness Channel in an RGB Output.
The Output now only gives you the Specular Level.
- The Node was outputting specular colors with intensity values lower than 1 for metallic areas
- mari.utils.reloadAllI()
- mari.utils.reloadAll() was getting blocked from executing fully when Extension Pack was installed.
|
DEVELOPER & DEPLOYMENT UPDATES |
Click on a feature for more information
API has been added to determine the currently installed Extension Pack Version
 A new mari.ExtensionPack.version() python class has been added allowing you to read out JSON Path, major version,
minor version, patch and build number.
 The Extension Pack Version Data can now be read in as a JSON File
- Version Conflict Resolving methods for detecting conflicting scripts from the JTOOLs Script Package were
removed at studio request
This was done to simplify the code for the __init__.py file that is responsible for loading Extension Pack.
- A new tool has been added to the Scripts / Python Menu allowing you to search for an action
- A new tool has been added to the Scripts / Python Menu allowing you to search for an action's UI path
- A new tool has been added to the Scripts / Python Menu allowing you to search through Mari classes and methods
- Menu Actions were previously added via a file tools_menu.py inside of your /Mari/Scripts/ExtensionPackVersion/Tools/ Folder.
The File has now been renamed to gui_actions.py for clarity
- The primary Extension Pack class used to launch its python tools has been renamed from 'mari.customScripts' to 'mari.ExtensionPack'
(accessible via mari.ExtensionPack.utils() )
- findNodeGraphContext()
will return the currently open Nodegraph Tab
- recursiveNodeList(node_list)
will return a list of a nodes including contents of groups
- recursiveGroupNodeList(node_list)
will return a list of a group nodes
- findConnectedNodeOutput(graph,node_to_find, skipDotNodes=False)
will return a list of nodes connected to the Output of the node to find
- mariMainWindowObject()

will return the Mari Main Window Object
- setNodegraphContext()

Will set the Context to the Nodegraph so Hotkeys work in "Nodegraph Context" Mode
- You can now restrict Nodes to load only in specific MARI Versions by using the
<MinMariVersion> and <MaxMariVersion> tags in the Node XML files.
The tags are optional. You can have just a <MinMariVersion> tag, just a <MaxMariVersion> one
or leave them out completely if not required.
Examples:
Restrict a Node to Mari 3.1 or higher: <MinMariVersion>30101000</MinMariVersion>
Restrict a Node to Mari 3.0v3 or lower: <MaxMariVersion>30003300</MaxMariVersion>
- a new perUdimPivot boolean (true/false) argument was added to the openGl relUVTransform() function
|
CREDITS |
- Jorel Latraille - http://www.jorel-latraille.com
- Antonio Neto - https://netocg.blogspot.com
- David Enschrich
- Alexandre Tessier
- Peter Aversten
- Aaron Clark
- Yasin Hasanian
- Pim Hendriks
- Mieszko Lacinski
- Richard Moss
- Michael Rochefort
- Johan Sundberg
- Khaled Pamir
- Gabriel Salas Quesada
