|
Attribute Table View |
The Attribute Table lists all Metadata of the Node and allows you to edit its values. Metadata can be exposed Attributes in the Node Properties of the Node, or hidden, additional Data that is stored on the Node and not usually visible.
While the Table view has many different columns, you can freely reorder them to have the view you best like, by dragging the headers

To resize a column, drag the corners of the headers

Column Order and Size is stored and restored between Node Editor Sessions.

The Attribute Filter can be used to filter and hide Attributes in the Table View.
- Search

Use the Text Field to enter your word searches. As in other Extension Pack Filter Fields, you can use several Operators to fine tune your search.
Searches are case-insensitive meaning "SpeCuLar" would be treated as "specular".
Filtering Operators are
- Comma (,)____________
Separate multiple search terms or search term operators via a comma. If any of the terms is found, the row in the Table will be displayed
e.g.: specular,color,subsurface will display any attribute row that has specular, color or subsurface in any of the searched columns
- Plus (+)_____________
The Plus (+) operator stipulates a combination of terms that are required to be a filter match
e.g.: specular+color will display any attribute row that has both specular and color in its searched columns
- Exclamation Mark (!)_____________
The Exclamation Mark (!) operator excludes a search term
e.g.:
- Search String "Specular" will return any Attribute Row containing "Specular", such as "Specular Roughness", "Specular Color" etc.
- Search String 'Specular+!Color' will return only rows that contain "Specular" but not contain "Color"
You can combine operators freely e.g. Specular+Color+!ClearCoat,Roughness will display any row that has
- Both "Specular" and "Color" in the searched Columns, but not "ClearCoat"
- or has Roughness in the searched Columns
- Clear Search

The "Clear Search" Button will reset the Search Field to be empty
- Toggle Search on/off


Hotkey: F
The "Toggle Search" Button allows you to disable the Search without clearing your Search Terms from the Text Field.
- Search in ..

The "Search in .." dropdown and the Tags below it, determine which Columns of the Table View the search is performed in.
The visible Tags are the active Columns to Search.
To add additional Tags, choose them from the dropdown. To remove a Tag, click on the Tag Button itself.
If there are no tags at all selected, all columns will be searched.
If the "Any" tag is added, all other tags are ignored and all columns will be searched as well.
Cells in the Table can be edited via
- a double-click
- pressing ENTER or RETURN with a cell selected
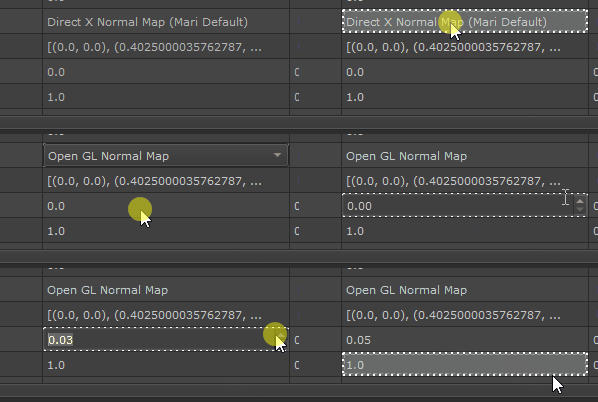
Some Cells are read-only and cannot be edited when..
- The Column is marked red
- The Cell contains the Text "Unavailable"
Example of read only cells

The full value of a cell is always visible in the tooltip
Selecting a cell from the columns ..
- Pretty Name
- Description
- Group
- Tab
.. will select the corresponding Attribute of the Table Row in the Tree View. Vice Versa, selecting an Attribute in the Tree View, will select the "Pretty Name" Cell of the Attribute in the Table view.
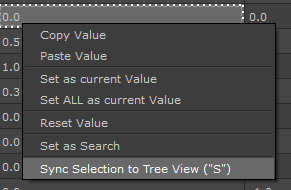
Other columns are usually not auto-synced to the Tree View. However you can force sync them by
- Selecting a cell and pressing Hotkey S
- Right Mouse Clicking on the Cell and choosing "Sync Selection to Tree View"
|
Column Overview |

The "Attribute Name" Column contains the internal name of an Attribute. The internal Name of an Attribute is always unique on the Node and cannot be changed.
The internal Name might be the same as the "Pretty Name" if no separate "Pretty Name" was defined.

Right Mouse Clicking on an "Attribute Name" Cell allows you to
|
Copy Value |
copy the text of the Cell to the internal Clipboard |
|
Set as Search |
set the text of the cell as the active Search term in the Filter field of the dialog |

The "Attribute Source" Column lists the Nodename and Attribute Name where the Attribute on the current Node originates from.
Usually this column only contains data, when the Node you are currently editing is a Group Node, Material or Custom procedural with Node Attributes exposed from its subgraph to
the top node.
A single Attribute can have more than one Source Attribute, if it is a so called "linked Attribute", where a single Setting controls multiple node attributes.
To see the full list of all Source Nodes and their Attributes, hover your cursor over the field to activate the Tooltip.
To jump to a Source Node or its Node Properties, you can use the "Jump to .. " Options found as buttons at the top of the dialog
With an Attribute in Tree View selected, single click on the Button or press Hotkey Alt+A to open the Source Node Properties.
Double click or press Hotkey Alt+F to jump the Nodegraph to the Source Node

Right Mouse Clicking on an "Attribute Source" Cell allows you to
|
Copy Value |
copy the text of the Cell to the internal Clipboard |
|
Set as Search |
set the text of the cell as the active Search term in the Filter field of the dialog |

The "Pretty Name" is the Name of the Attribute as it is displayed in the Node Properties.
If the "Pretty Name" is empty, the "Attribute Name" is used instead.
Clicking in the "Pretty Name" Cell will select the Attribute in the Tree View.
The "Pretty Name" can then be changed via double-clicking in the Cell in the Table View or by double clicking the Attribute in the Tree View.

Right Mouse Clicking on a "Pretty Name" Cell allows you to
|
Copy Value |
copy the text of the Cell to the internal Clipboard |
|
Paste Value |
paste text from the internal Clipboard into the Cell |
|
Set as Search |
set the text of the cell as the active Search term in the Filter field of the dialog |

The "Description" Field can be used to define a Tooltip for a Node Properties Attribute.

Clicking in the "Description" Cell will select the Attribute in the Tree View.

Right Mouse Clicking on a "Description" Cell allows you to
|
Copy Value |
copy the text of the Cell to the internal Clipboard |
|
Paste Value |
paste text from the internal Clipboard into the Cell |
|
Set as Search |
set the text of the cell as the active Search term in the Filter field of the dialog |

The "Group" Cell defines the Group, the Attribute will appear in, in the Node Properties.
Entering a Group Name into the Cell, that does not exist yet, will automatically create the Group for you in the Tree View.
Leaving the Group name empty, will add the Attribute without Grouping to the top of the Node properties.

You can reorder the Attributes in the Tree View via Drag & Drop

Clicking in the "Group" Cell will select the Attribute in the Tree View.

Right Mouse Clicking on a "Group" Cell allows you to
|
Copy Value |
copy the text of the Cell to the internal Clipboard |
|
Paste Value |
paste text from the internal Clipboard into the Cell |
|
Set as Search |
set the text of the cell as the active Search term in the Filter field of the dialog |

The "Tab" Cell defines the Tab, the Attribute will appear in, in the Node Properties.
Entering a Tab Name into the Cell, that does not exist yet, will automatically create the Tab for you in the Tree View.
Leaving the Tab name empty, will add the Attribute to the default Tab of the Node.
|
|
|
Clicking in the "Tab" Cell will select the Attribute in the Tree View.

Right Mouse Clicking on a "Tab" Cell allows you to
|
Copy Value |
copy the text of the Cell to the internal Clipboard |
|
Paste Value |
paste text from the internal Clipboard into the Cell |
|
Set as Search |
set the text of the cell as the active Search term in the Filter field of the dialog |

The "Current Value" Field holds the value of an Attribute as it is currently set.
Please note, that the value is not live-synced to the scene, so making a change to the Value of an Attribute after the Node Editor was launched, will mean the "Current Value" cell will be out of sync with your scene. You can however resync the value to the scene via the Right Mouse Click Menu of the Cell.
The "Current Value" is the value of an Attribute in the Node Properties
Depending on the "Attribute Type" of the Attribute Row you are editing, the current Value will look different.
It could be for example a floating point value or integer (full number) value, a color swatch, a list of points etc.
Therefore, depending on the Value Type, different actions might happen when you edit the value (double-click or Enter), for example a Number Field might appear, or a Dropdown, or another dialog might open (e.g. a Color Picker).
Examples of different types of "Current Value" Cells
The "Current Value" cells are part of the few types of cells, that will not auto sync the selection to the Tree View. However you can always press Hotkey S to sync the Attribute Selection to the Tree View by force.
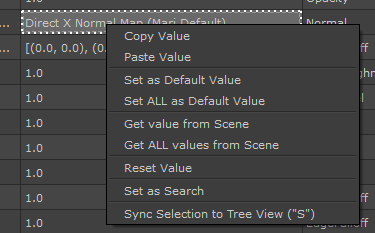
Right Mouse Clicking on a "Current Value" Cell allows you to
|
Copy Value |
copy the text of the Cell to the internal Clipboard |
|
Paste Value |
paste text from the internal Clipboard into the Cell |
|
Set as Default Value |
applies the current Value to the "Default Value" Cell of the row |
|
Set ALL as Default Value |
applies all current Values of all Attribute Rows to their respective "Default Value" Cells |
|
Get value from Scene |
scans your current scene for the Attribute on the Node and updates the "Current Value" cell with the value in the scene |
|
Get ALL values from Scene |
scans your current scene for all Attributes on the Node and updates the corresponding "Current Value" cell with the value in the scene for each Attribute |
|
Reset Value |
resets the "Current Value" Cell to the value it was at, when the dialog was first launched |
|
Set as Search |
set the text of the cell as the active Search term in the Filter field of the dialog |
|
Sync Selection |
selects the Attribute of the row you are editing in the Tree view. |
Depending on the Attribute Type, other options might be available in the Right Mouse Click Context menu, e.g. for Color Attributes you have additional Options to toggle the Color to Scalar Mode or change the value to some defaults such as Black, White, Grey or Transparent.


The "Default (Value)" Field holds the value an Attribute will be reset to, when pressing the "R" Button in the Node Properties
The default Value is set when pressing the "R" Button in the Node Properties
Depending on the "Attribute Type" of the Attribute Row you are editing, the Value will look different.
It could be for example a floating point value or integer (full number) value, a color swatch, a list of points etc.
Therefore, depending on the Value Type, different actions might happen when you edit the value (double-click or Enter), for example a Number Field might appear, or a Dropdown, or another dialog might open (e.g. a Color Picker).
Examples of different types of "Default Value" Cells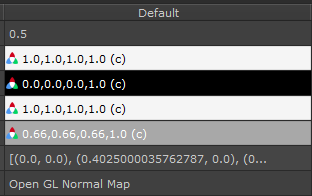
The "Default Value" cells are part of the few types of cells, that will not auto sync the selection to the Tree View. However you can always press Hotkey S to sync the Attribute Selection to the Tree View by force.

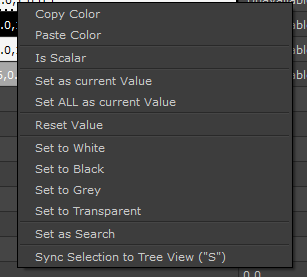
Right Mouse Clicking on a "Default Value" Cell allows you to
|
Copy Value |
copy the text of the Cell to the internal Clipboard |
|
Paste Value |
paste text from the internal Clipboard into the Cell |
|
Set as current Value |
applies the current default Value to the "Current Value" Cell of the row |
|
Set ALL as current Value |
applies all current default Values of all Attribute Rows to their respective "Current Value" Cells |
|
Reset Value |
resets the "Default Value" Cell to the value it was at, when the dialog was first launched |
|
Set as Search |
set the text of the cell as the active Search term in the Filter field of the dialog |
|
Sync Selection |
selects the Attribute of the row you are editing in the Tree view. |
Depending on the Attribute Type, other options might be available in the Right Mouse Click Context menu, e.g. for Color Attributes you have additional Options to toggle the Color to Scalar Mode or change the value to some defaults such as Black, White, Grey or Transparent.

The "Min" (Minimum) fields only apply to numerical attributes and determine the lowest number the attribute can take.
|
|
|
The "Minimum Value" cells are part of the few types of cells, that will not auto sync the selection to the Tree View. However you can always press Hotkey S to sync the Attribute Selection to the Tree View by force
Right Mouse Clicking on a "Minimum Value" Cell allows you to
|
Copy Value |
copy the text of the Cell to the internal Clipboard |
|
Paste Value |
paste text from the internal Clipboard into the Cell |
|
Remove Minimum |
Completely removes the minimum Value from the Attribute. The cell will state "-not set-" |
|
Reset Value |
resets the "Minimum Value" Cell to the value it was at, when the dialog was first launched |
|
Set as Search |
set the text of the cell as the active Search term in the Filter field of the dialog |
|
Sync Selection |
selects the Attribute of the row you are editing in the Tree view. |

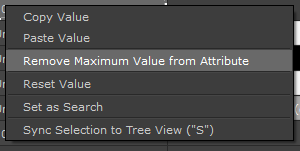
The "Max" (Maximum) fields only apply to numerical attributes and determine the highest number the attribute can take.
|
|
|
The "Maximum Value" cells are part of the few types of cells, that will not auto sync the selection to the Tree View. However you can always press Hotkey S to sync the Attribute Selection to the Tree View by force
Right Mouse Clicking on a "Minimum Value" Cell allows you to
|
Copy Value |
copy the text of the Cell to the internal Clipboard |
|
Paste Value |
paste text from the internal Clipboard into the Cell |
|
Remove Maximum |
Completely removes the maximum Value from the Attribute. The cell will state "-not set-" |
|
Reset Value |
resets the "Maximum Value" Cell to the value it was at, when the dialog was first launched |
|
Set as Search |
set the text of the cell as the active Search term in the Filter field of the dialog |
|
Sync Selection |
selects the Attribute of the row you are editing in the Tree view. |

The "Attribute Type" field lists what Data the Attribute will accept. You cannot change the value type of an attribute.
There are many different Data Formats available. The most common ones are
- Strings (Text)
- Int (Integer, full numbers)
- Double (Numbers with 2 decimals)
- Float (Numbers with high Decimal Counts)
- MriColor (Color Values)
- SringLists (usually manifest as Dropdowns)
- UserEnums (usually manifest as Dropdows, that can be edited via the "Item Lists")
- MriGradient (Curves)
- etc.
Attribute Types are a limiting factor on
- copy/paste .. you can only paste values from another attribute, if the two attributes have the same type
- linking ... you can only link attributes of the same type.
Different Attribute Types are marked as different Icons in the Tree View. Below we can see the icons for the three types "mriColor","Double" and "Float"


The "Step" Field determines what kind of Interface UI you will be presented with, when modifying a numerical value and in which increments you will be modifying the numerical input.
|
|
|
For most numerical fields the "Steps" value will not be set (as indicated by the "-Not set-" label). If you choose to set a value (via double click or pressing Enter),
the Node Properties interface item of the Attribute will switch to a so called Spin Box. The Step Value will determine in what increments the value will change if the top/bottom arrows of the Spinbox are clicked.
Example of a Spinbox (top) vs a Slider (bottom):
The "Step Value" cells are part of the few types of cells, that will not auto sync the selection to the Tree View. However you can always press Hotkey S to sync the Attribute Selection to the Tree View by force

Right Mouse Clicking on a "Step Value" Cell allows you to
|
Copy Value |
copy the text of the Cell to the internal Clipboard |
|
Paste Value |
paste text from the internal Clipboard into the Cell |
|
Remove Value |
Completely removes the Value from the Attribute. The cell will state "-not set-" |
|
Reset Value |
resets the "Step" Cell to the value it was at, when the dialog was first launched |
|
Set as Search |
set the text of the cell as the active Search term in the Filter field of the dialog |
|
Sync Selection |
selects the Attribute of the row you are editing in the Tree view. |

The "Item List" Cells are special, since they only apply to Attributes of type "MriUserEnum"
"UserEnums" describe user-defined Dropdown Menus and the Item list Cell, allows you to edit the amount and names of items inside the dropdown.
Example of a UserEnum Dropdown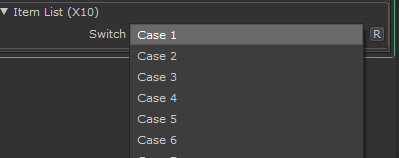
Only a small number of Nodes support Item Lists and User Enums. Extension Pack has currently two nodes that can be edited this way. Both nodes also allow exposing and editing of their Dropdowns via a Material, Group Node or Custom procedural.
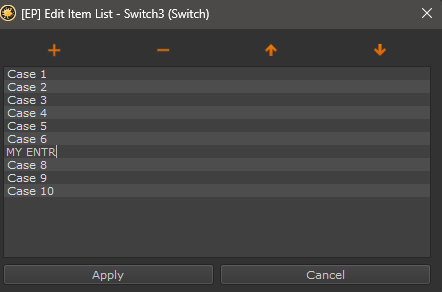
For a more detailed description on how to work with Item lists, please refer to the dedicated Item List Help Section.
Example of editing an Item List Cell
The "Step Value" cells are part of the few types of cells, that will not auto sync the selection to the Tree View. However you can always press Hotkey S to sync the Attribute Selection to the Tree View by force
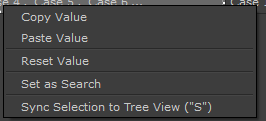
Right Mouse Clicking on a "Item List" Cell allows you to
|
Copy Value |
copy the text of the Cell to the internal Clipboard |
|
Paste Value |
paste text from the internal Clipboard into the Cell |
|
Reset Value |
resets the "Step" Cell to the value it was at, when the dialog was first launched |
|
Set as Search |
set the text of the cell as the active Search term in the Filter field of the dialog |
|
Sync Selection |
selects the Attribute of the row you are editing in the Tree view. |


