|
Tree View |
The Tree View and the corresponding UI of the Node Properties:


The Tree View is the Hierarchy Representation of the way the Node Properties will look, when changes are applied to the Node. It allows you to rename, reorder add and remove Tabs, Groups and Attributes.
You can define Tabs to house Groups and Attributes, to better structure your Node Properties.
Example of different Tabs in the Node Properties
- Creating new Tabs
To create a new Tab, enter a Tab Name in the "Tab" Column of an Attribute in the Table View.
Alternatively click on the "New Tab" Button above the Tree View or press Hotkey T.
- Deleting Tabs
To delete a Tab, remove all its Attributes and Groups first. You can do this by dragging and dropping them somewhere else or using the "Delete" Button to delete the Attributes
permanently.
Empty Tabs that existed on launch of the Node Editor, or Tabs that were created via the Table View will be auto-deleted once empty.
If the Tab was created manually via the "New Tab" Button it won't be auto-deleted. In this case you need to manually delete the empty tab by selecting it and pressing the "Delete" Button
- Default Tab

The Default Tab is the first Tab in the Node Properties. It is usually auto-named by mari according to the Node Type or name.
If you have no Tab defined for an Attribute (Empty Cell in the "Tab" Column of the Table View), the Attribute will be added to the Default Tab.
Example of several Attributes with an empty "Tab" Cell, belonging to the Default Tab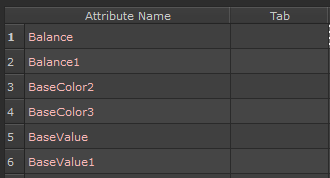
- Renaming Tabs
You can rename a Tab by double-clicking its Name in the Tree View and entering a new Name.
Alternatively you can edit all "Tab" Columns of Attributes found under the Tab.
Leaving the Tab Name empty, will define it as the "Default Tab". The Default Tab is the first Tab in the Mari Node Properties, which is usually auto-named according to the Node Type or Name.
- Reordering Tabs (workaround)
Mari auto-orders Tabs in the Node Properties alphabetically. However often times this can lead to undesired results.
You can force a certain Tab order by adding Spaces before a Tab name.
In the below example "Images" has two spaces (" Images"), "Transform" has one Space (" Transform") in front of its Name. This forces Mari to put the Images Tab before the Export Tab and the Transform Tab after the Images Tab. 
Attributes can sit within (optional) Groups within the Node Properties
Example of different Groups in a Tab in the Node Properties
- Creating new Groups
To create a new Group, enter a Group Name in the "Group" Column of an Attribute in the Table View.
Alternatively click on the "New Group" Button above the Tree View or press Hotkey G.
- Deleting Groups
To delete a Group, remove all its Attributes first. You can do this by dragging and dropping them somewhere else or using the "Delete" Button to delete the Attributes
permanently.
Empty Groups that existed on launch of the Node Editor, or Groups that were created via the Table View will be auto-deleted once empty.
If the Group was created manually via the "New Group" Button it won't be auto-deleted. In this case you need to manually delete the empty Group by selecting it and pressing the "Delete" Button
- Ungrouping Attributes
Attributes can exist outside of Groups. Below you can see an example of multiple Attributes being ungrouped.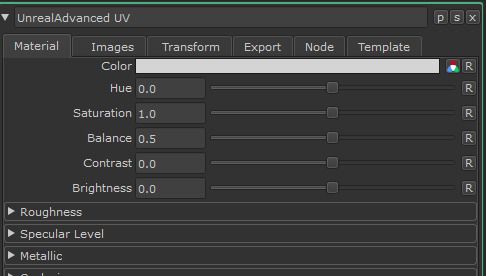
You can ungroup Attributes by dragging them into the "(No Group)" Container of a Tab, or by removing the Text from the "Group" Cell in the Table View.
If no "(No Group)" Container exists yet, you can create one by creating a Group without a Name.
The "No Group" Container in the Tree View: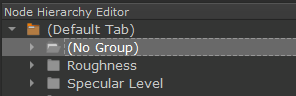
Examples of Attributes with and without a Group in the Table View
- Renaming Groups and the (No Group) - Container
You can rename Groups within the Tree View, by double-clicking on a Group Name. Alternatively you can change the name of all "Group" Cells of Attributes within the Table View.
Leaving a Group name empty within the Tree View will convert it to the "(No Group)" Container.
- Reordering Groups
You can change the order in which Groups appear in the Node Properties, simply via Drag & Drop in the Tree View. To assign a Group to another Tab, drag it onto the Tab
- Setting default Group open/close State
By default a Group will be open when the Node Properties are loaded. You can however change this, so a Group is closed by default.
A open and a closed Group in the Node Properties
To do so, select the Group you want to edit in the Tree View and click the "Toggle Group Open/Close" Button above the Tree View or press Hotkey O
The Group Icon in the Tree View will change to indicate the new state:

The Icon on the left indicates the Group is closed when the Node Properties are opened, the icon on the right indicates a Group that is open by default.
Attributes correspond to so called "Metadata" on a Node. Metadata may be a user-controllable setting in the Node's Node Properties, or hidden Data that is used by Tools.
- Renaming an Attribute
The "Display Name" - the Label of a Setting in the Node properties - can be directly changed in the Tree View by double-clicking on the Name of the Attribute.
This is the same as changing the "Display Name" Cell of the Attribute in the Table View.
- Synced Selection between Tree View and Table View
Clicking on an Attribute within the Tree View will Highlight the Attribute's "Display Name" Cell in the Table View.
Vice versa, selecting a cell in the Table View from the columns
- Pretty Name
- Description
- Group
- Tab
.. will select the corresponding Attribute in the Tree View.
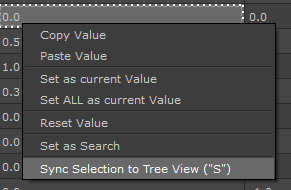
Other columns are usually not auto-synced to the Tree View. However you can force sync them by
- Selecting a cell and pressing Hotkey S
- Right Mouse Clicking on the Cell and choosing "Sync Selection to Tree View"
- Reordering Attributes
Attributes can be easily reordered via drag & drop in the Tree view.
To assign an Attribute to another Group or Tab, drag the Attribute on the Target Group or Tab.
Alternatively you can change the "Tab" and "Column" Cells of the Attribute in the Table View.
- Deleting Attributes
To delete an Attribute, select it in the Tree View and press the "Delete" Button over the Tree View
Depending on how many other Node Settings the selected Attribute controls, you might be presented with a dialog.
Any Node that is selected in an open Nodegraph is auto-selected in this dialog and listed at the top.
This can help, if you have many links to a single attribute and are unsure what attribute exactly you need to remove.
In this case locate and select the node in your Group Node Subgraph, where you want to remove a connection. Then open the "Delete Attribute" Dialog above.
|
|
|
- Jumping to Attribute Source
By using the "Jump to .." Button you can jump your Node Properties and/or Nodegraph directly to the Source of the Attribute.

The "Jump to Source" Button is a Double-Action button, that executes different functionality depending on if you single click or double-click on the button.
It allows you to jump to the Source Node or Source Node Properties of the Attribute, that is currently selected in the Tree View.
The Source Node is the Node that exposed the Attribute to the Parent Node (e.g. Material, Custom Procedural or Group Node).
The Source Nodes of any Attribute are listed in the "Attribute Source" Column of the Table View
Example of the Source Node ("Base Color [Value Adjust]") and Source Attribute ("Balance")
of an exposed Attribute
- To open the Source Node's Node properties, perform a single click on the Button or press the Hotkey ALT+A
- To jump your Nodegraph Palette View to the Source Node and open its Node Properties, double-click on the Button or press the Hotkey ALT+F
- Attribute Type Icons
Each Attribute has an Icon in the Tree View, representing the Data Type is accepts.
There are many different Data Formats available. The most common ones are
- Strings (Text)
- Int (Integer, full numbers)
- Double (Numbers with 2 decimals)
- Float (Numbers with high Decimal Counts)
- MriColor (Color Values)
- SringLists (usually manifest as Dropdowns)
- UserEnums (usually manifest as Dropdows, that can be edited via the "Item Lists")
- MriGradient (Curves)
- etc.