|
Presets |
The Preset Section can be opened via the "Show Presets" Button or via Hotkey P.

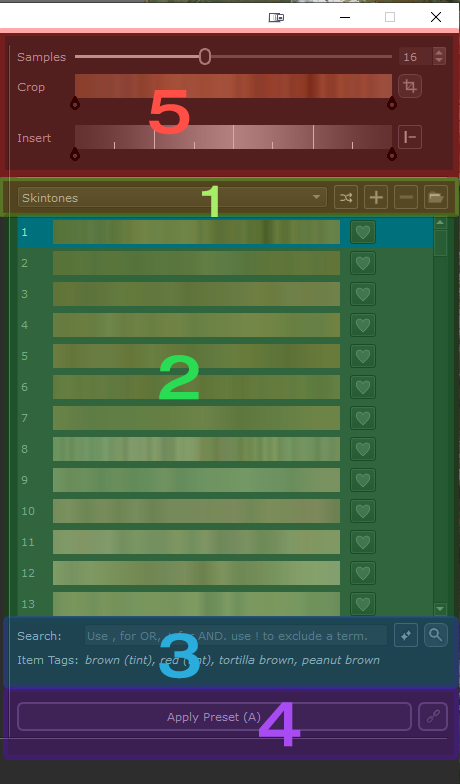
The Presets subsection of the interface gives access to many preset-related features.
- Store and restore User Presets
- Access a large Number of Extension Pack default Presets (e.g. sorted by Color and use-cases like "Skintones"
- Favorite/Bookmark items to the "Favourite" Category
- Access Project Snapshots
- Load presets with advanced controls such as "Insert into Range" and "Cropping"
|
1 - Categories |
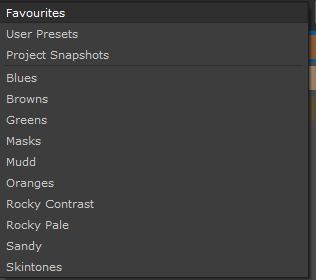
The Category Dropdown allows you to set the active Category. Above you can see the standard ones that exist when the Tool first starts.
You can create your own custom categories for this list.
- Favourites house items from any category (default or user made) that have been marked with the heart. It provides a convenient way to collect your preferred presets in one place
- User Presets is the default category where user saved gradients will be added to, unless you create your own categories.
- Project Snapshots houses Gradient Snapshots that have been done via the Main Ramp Interface Dialog using CTRL+S or the Snapshot Button. Project Snapshots only exist within a Mari Project and do not carry over to other projects.

- Extension Pack Default Presets are pre-generated Gradient Presets for different use cases such as colorizing skin or terrains.

Hotkey : S
"Select Random Item" will choose a random preset from the currently chosen category.
This can be a fun way to quickly experiment with different looks.
|
|
TIP: Auto-apply Presets |

Hotkey : ALT + + (plus)
Creates a new Preset from the current Gradient in the main Ramp Editor interface.
New presets can only be added to the User Presets Category or a category you yourself created. If no eligible category is selected, the Preset category will auto-switch to the "User Presets" category and add the new preset there.
Preset categories that are unavailable for new user presets are:
- Favorites category (favorites need to be added via the heart button next to a preset)
- Project Snapshots (can only be added via the Project Snapshot button in main dialog)
- Extension Pack default Preset categories (e.g. Skintones)

Hotkey : ALT + DEL
Deletes the currently selected Preset.
If you are within the Favorites category, the selected item will be removed only from the Favorites.
You cannot delete presets from Extension Pack default Preset categories (e.g. Skintones)

The "Category Management" Menu allows you to
- Add Category - add a new User Category with a custom Name
- Rename Category - rename a user created Category Name
- Remove Category - delete a user created Category. All presets within the category will be permanently deleted
- Set current as Default - define the currently active category in the Selection Dropdown, as the Category that will be selected by default, whenever the Ramp Editor opens.
|
2 - Preset List View |
The Preset list view allows you to apply, reorder, favorite and tag a preset.
Choose a preset from the list and apply it to the Ramp Editor main gradient with a double click.
You can navigate the list with the arrow up and down keys.
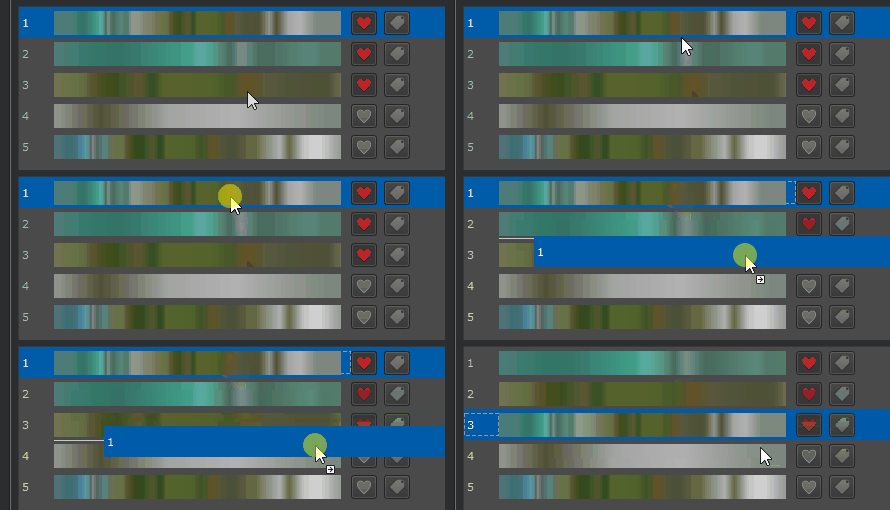
Favorites and User Categories can be reordered with drag and drop.

Hotkey : L
Press the heart button (or hotkey L) next to a preset to add the preset to the "Favourites" category.
Favourited items exist as shortcuts in the Favorites category. To remove a favourited item from the category, click its heart icon again or use the - Button when the Favourites Category is active


Any preset added to the Preset Editor by the user will be auto-tagged based on a list of color names. This helps searching for presets containing certain colors, using the Tag Search.
Tags are listed in the items tooltip and at the bottom of the Preset Subsection


However you are not limited to just those automatic tags and you can add your own or modify the existing auto-tags using the tag editor.
To open the tag editor, click on the tag button next to a preset ...

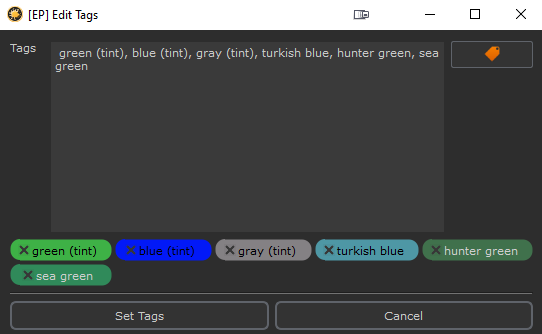
... and you will open the Tag Editor
- Adding new custom Tags:
To add a new tag, simply write in the text field, comma separating different tags. The new tag will appear in the tag button list at the bottom

- Removing Tags:
To remove a tag, delete it from the text field or simply press the corresponding tag button at the bottom
- Editing Auto Color Tags:
Extension Pack generates auto-tags, based on a list of color values and names.
You can edit the auto-tags via the Auto-Tag subdialog

Existing auto-tags are highlighted and you can add additional ones to your liking.
The color name of colors under the cursor is displayed at the bottom of the dialog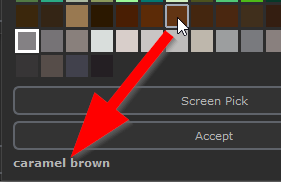
In addition you can also use the screen pick option to sample a color anywhere on screen ..
... and the picked color will be auto-added to the tags
|
3 - Tag Search |

Using the advanced Search field, you can filter out items from the current category display based on their tags e.g. "Show me everything that has red and yellow but not blue".
To learn more about tags see the topic Auto Tags & Tag Editor above.
The search supports several operators to fine tune your results
The Search is always case-insensitive, meaning "blue" lowercase will match to "BLue" or "blUE".
The search also uses a "match in" approach e.g. "brown" will match against "peanut brown"
Word Operators:
|
, (comma) |
Use the comma (,) operator to treat word searches as OR.
|
|
+ (plus) |
Use the plus (+) operator to tread word searches as AND
|
|
! (exclamation mark) |
Use an exclamation mark (!) operator to exclude words from the search
|
Global Operators
|
- (minus) |
Use the minus (-) operator to define global eclusions
|

Use the "sparkle" button to quickly clear the search field

Hotkey : ALT + F
Use the Magnifier Button to toggle the Search on/off without clearing the text field.

The tags of the currently selected Gradient Preset are displayed below the Tag Search field.
Tags for selected items can also be viewed in the item's tooltip
Tags can be edited using the tag editor

To learn more about tags see the topic Auto Tags & Tag Editor above.


Hotkey : A
When you chose and/or modified a preset you ultimately want to load it in to the main gradient of the Ramp Editor.
To do so you have multiple ways
- double click a preset in the item list
- press the Apply Button
- press Hotkey A
This will load the selected preset into the Ramp Editor Gradient, using the settings set in the Preset Editors top section (more on that below)
Sometimes however you do not want to constantly and manually apply a preset selection and instead have every preset you select, be instantly loaded into the Ramp Editor .. and, subsequently shown in the Mari viewport (if Node Updates aren't paused).
To do this, you can toggle the Auto-Apply Button:
Hotkey : ALT + A
With the button checked, (indicated by the orange icon), as soon as a selection changes in the item list view, the newly selected preset will be auto loaded into the Ramp Editor.
|
5 - Advanced Preset Settings |

Several options at the top of the Preset Section of the dialog, determine how the loaded Preset will appear in the Ramp Editor

The samples slider only is relevant to Extension Pack's standard presets and is disabled for any User Saved Preset.
Extension Pack's Presets are stored as lightweight 512 pixel wide image files, instead of as data files with individual color key positions.
The Samples slider determine how many color keys will be generated once the preset is loaded into the Ramp Editor.
Below you can see an example of the same preset loaded into the ramp editor with 8,16,32,64 and 128 samples.

While the default range of the Slider is set from 5 to 32 samples, you can enter manually samples into the value field next to it.
The slider range will adopt dynamically.
A maximum of 512 samples is supported though it will result in very densely populated ramps.

Cropping provides a great way to get more "bang for the buck" from a preset by limiting the parts you wish to load into the Ramp Editor
Below we have a terrain preset containing some water, sand and soil

Applying it to the main Ramp loads in the full range of the Preset
However you might only be interested in the sandy bits. By adjusting the crop handles we can easily isolate the part we want ..

.. and we end up with a completely different looking ramp in the Editor once we reapply the preset.

You can toggle the crop on and off at any time

Hotkey : ALT+C


By default, loading a preset will load the Preset into the Ramp Editor, covering the Ramp's full position range of 0 to 1. This might not always be desired.
Let's say I have a terrain where I want to add some water colors at the bottom of the ramp range.

To do this we can use the "Insert into Range" of the Preset editor

Choosing a nice blueish preset and applying it now adds the preset into the selected range

Several options are available in the dropdown menu next to the Insert Range widget

- Allow Gradient Insert
Hotkey: I
Determines if the "Insert into Range" should be evaluated when applying a preset
- Get range from Ramp Selection
Hotkey: ALT + \
Checks the current key selection in the Ramp Editor and sets the insert range to correspond with the lowest and highest key position that is selected in the main ramp.
If only one key is selected in the Ramp Editor, then the range is extended to 0 or 1, respectively - depending if the selected key is in a position below 0.5 or above. - Get Minimum range from Ramp Selection
Hotkey: ALT + [
Checks the current key selection in the Ramp Editor and sets the first Insert range position (left handle) to the selected position - Get Maximum range from Ramp Selection
Hotkey: ALT + [
Checks the current key selection in the Ramp Editor and sets the second Insert range position (right handle) to the selected position - Invert Range
Hotkey: ALT + I
Inverts the positions of the two "Insert Range" Handles
- Reset Range
Hotkey: ALT + O
Resets the "Insert Range" Handles to their original 0 and 1 positions.


